

 Deutsch
 Español
 Français
 Hrvatski
 Italiano
 Polski
 Português (BR)
Add & Manage Files/Folders
Overview
Document Management allows you to add and manage all the plans and documents which are relevant for your projects within PlanRadar. Also see Document Management.
Access & permissions
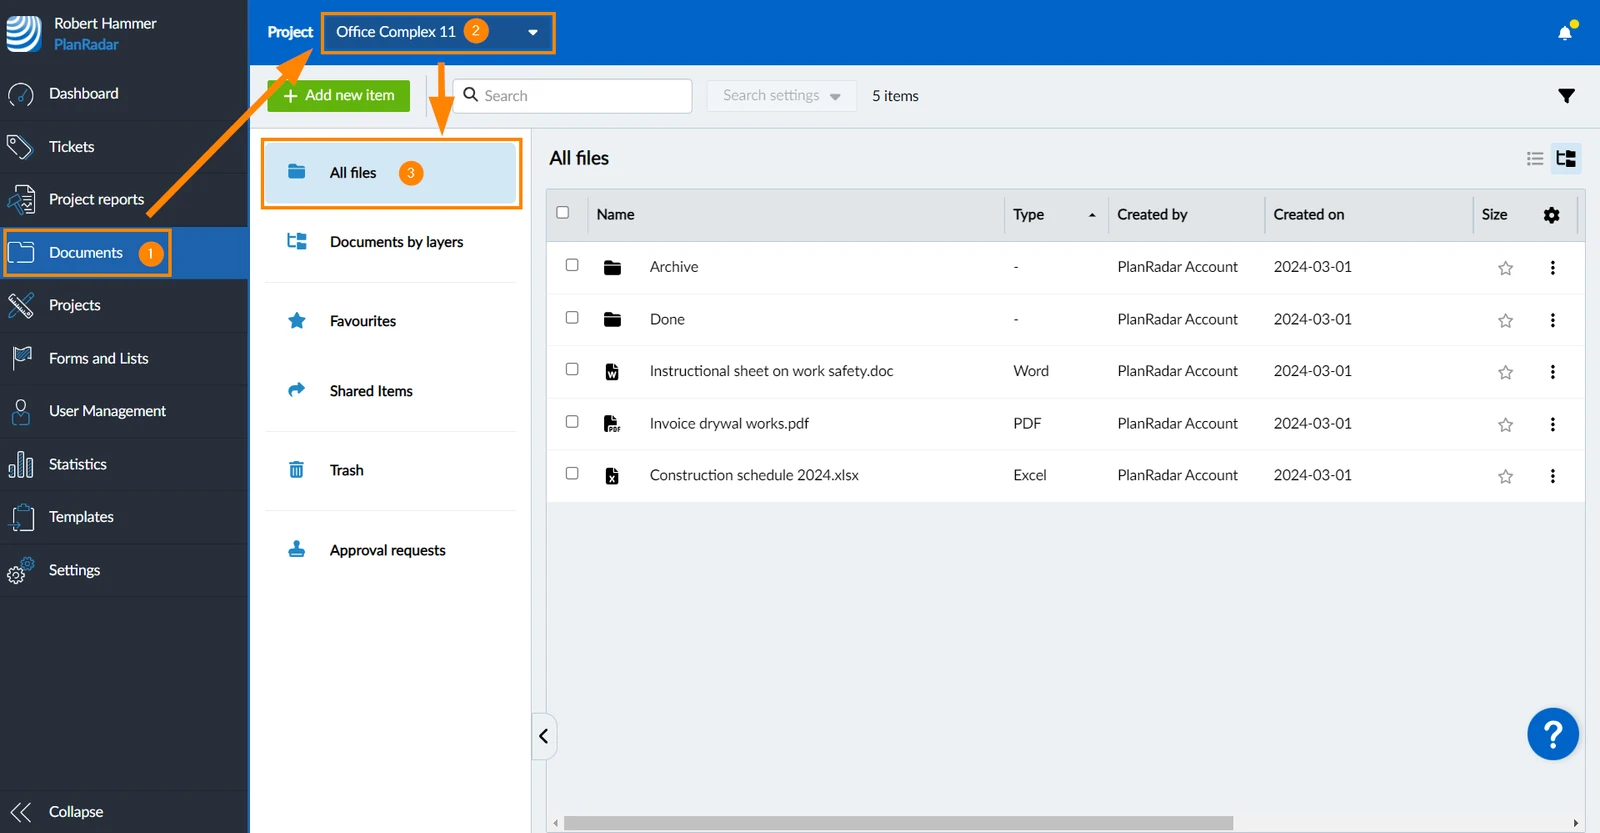
How to access Document Management
- Click Documents
- Select a project
- Click All files
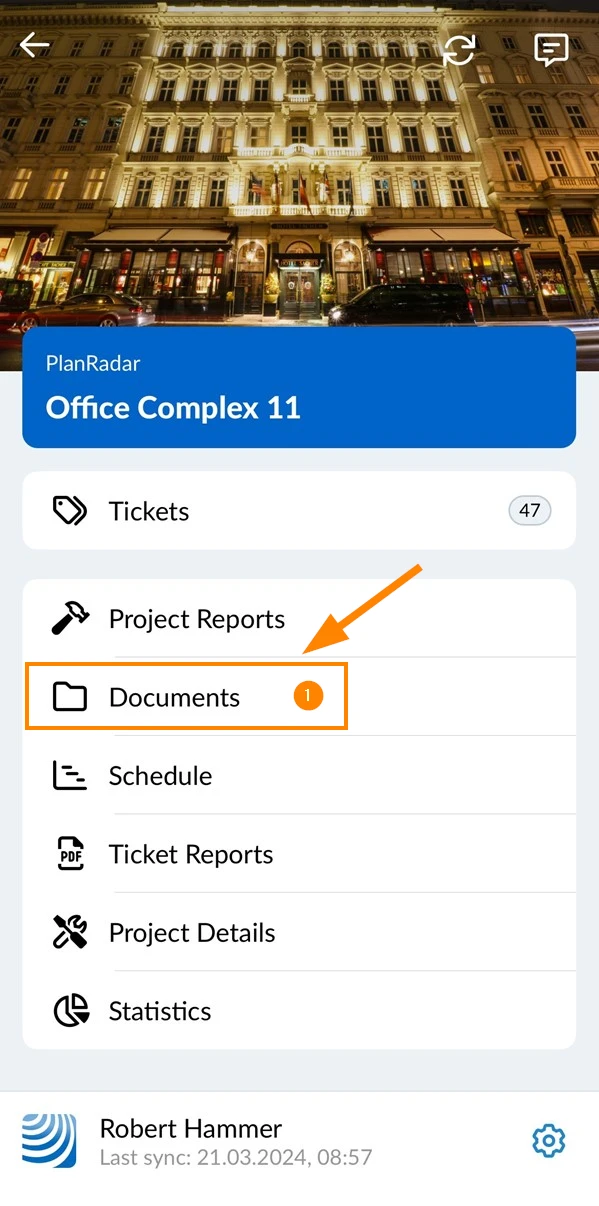
- Tap Documents
Create Folders
-
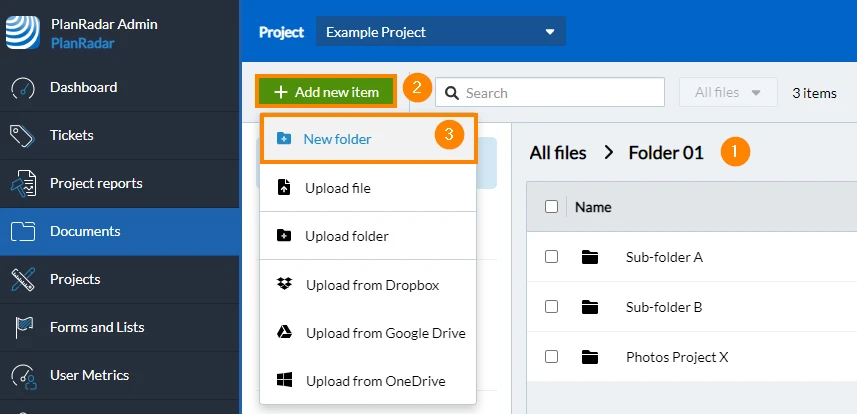
Navigate to All files or to the parent folder (where you want to create a folder)
-
Click + Add new item
-
Click New folder
-
Enter folder name
-
Click Create
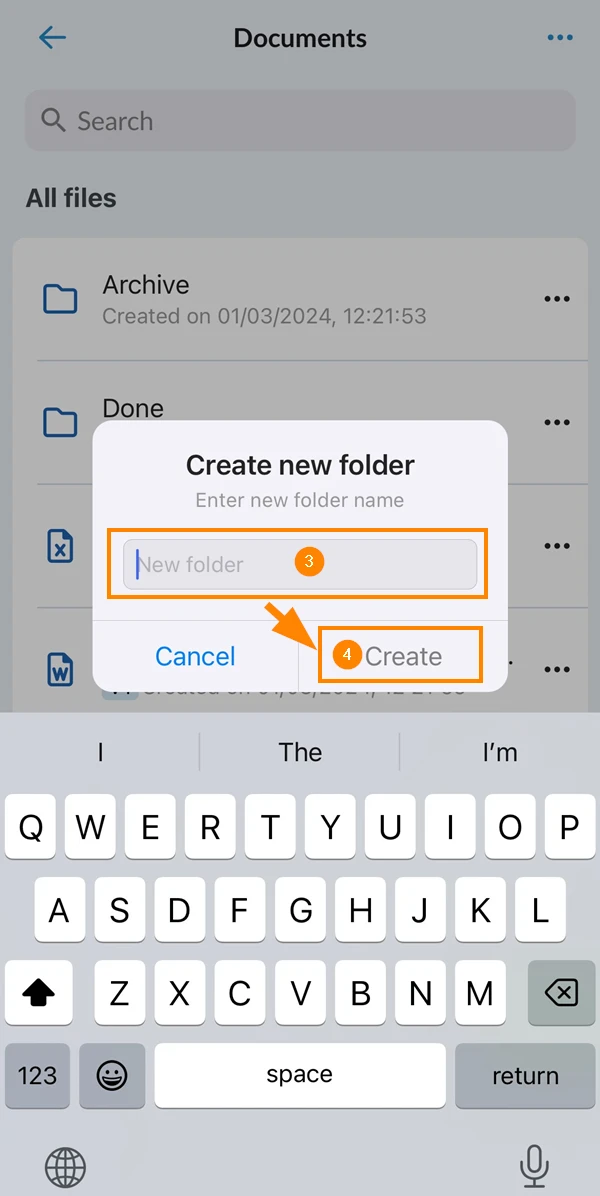
- Tap +
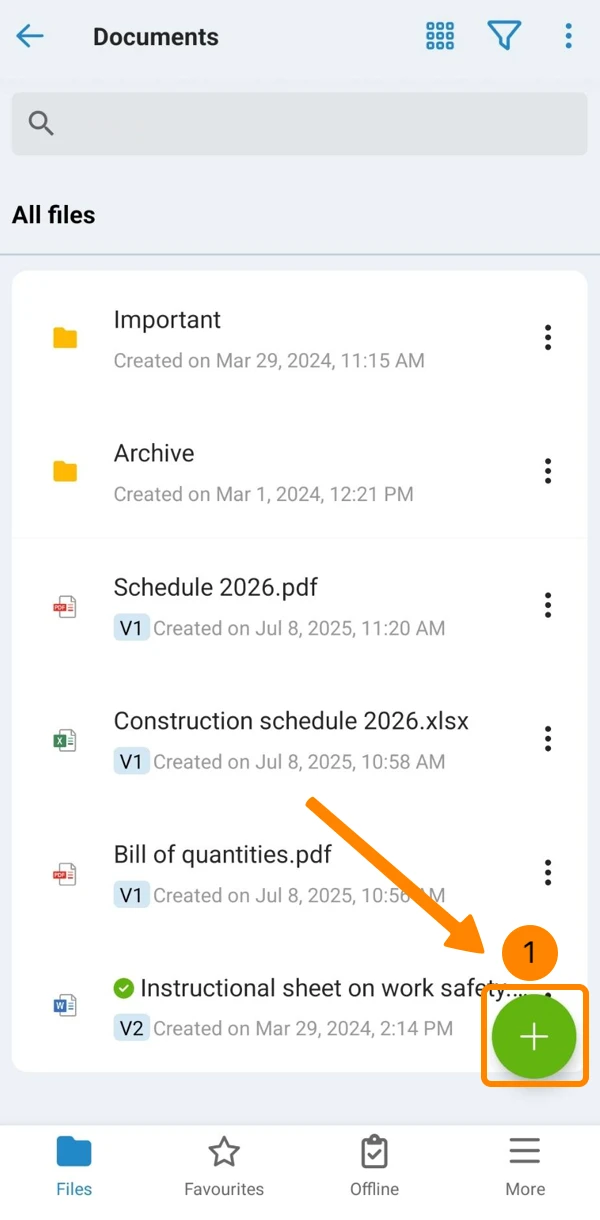
- Tap New Folder
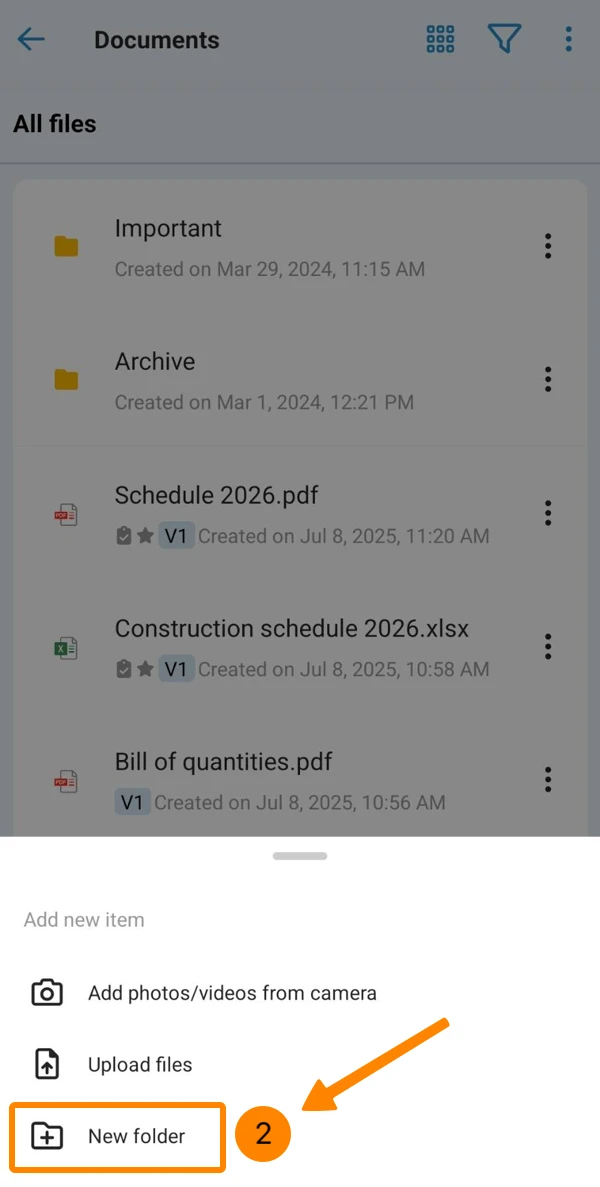
- Enter new folder name
- Tap Create
Upload Files
In the Webapp you can upload:
-
files or a folder (including sub folders)
- from your device
- from your cloud storage service
In the mobile app you can upload:
-
files
- from your device
- from your cloud storage service
-
photos/videos
- from your device gallery
- from your camera
Upload Files from your Device
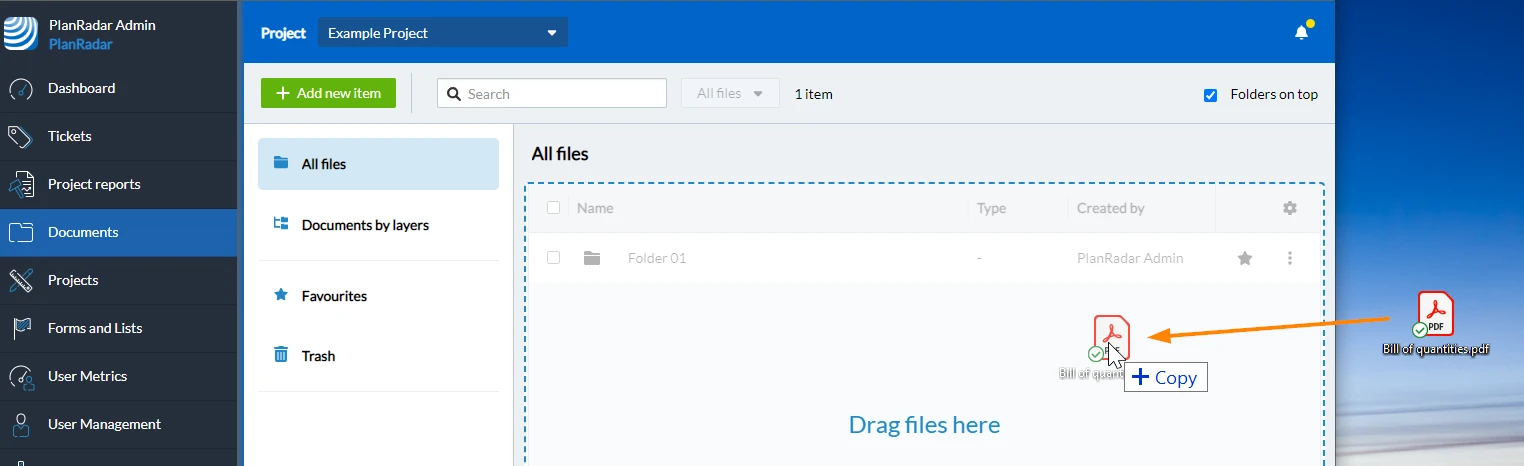
There are 3 ways to upload files in the Webapp:
Drag & drop files or a folder
Use file browser to upload files
- Click + Add new item
- Click Upload file
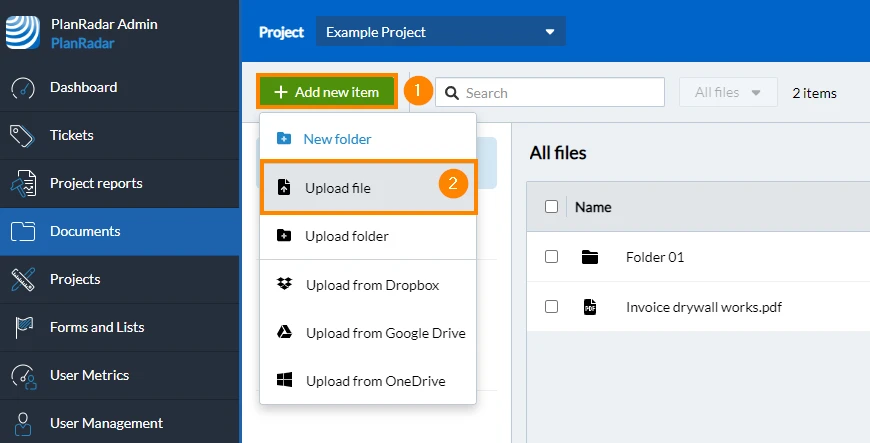
- The file browser of your operating system opens and you can select one or multiple files.
Use file browser to upload a folder (including sub folders)
- Click + Add new item
- Click Upload folder
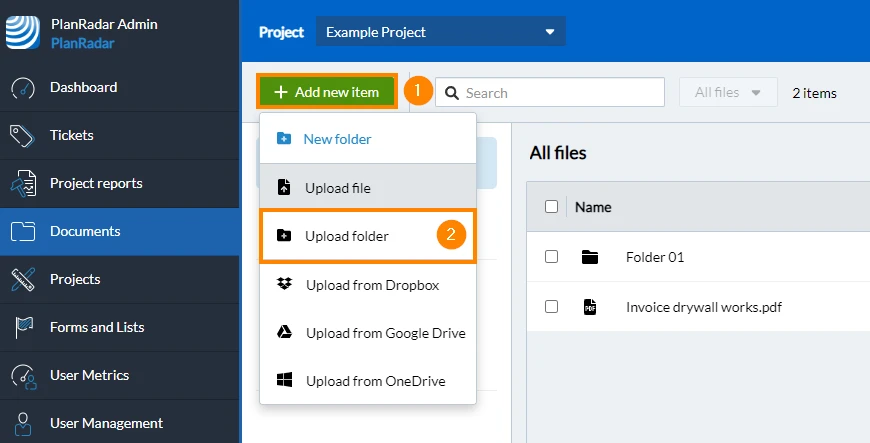
- The file browser of your operating system opens and you can select a folder.
To upload a file from your phone's local storage:
- Tap +
- Tap Upload Files
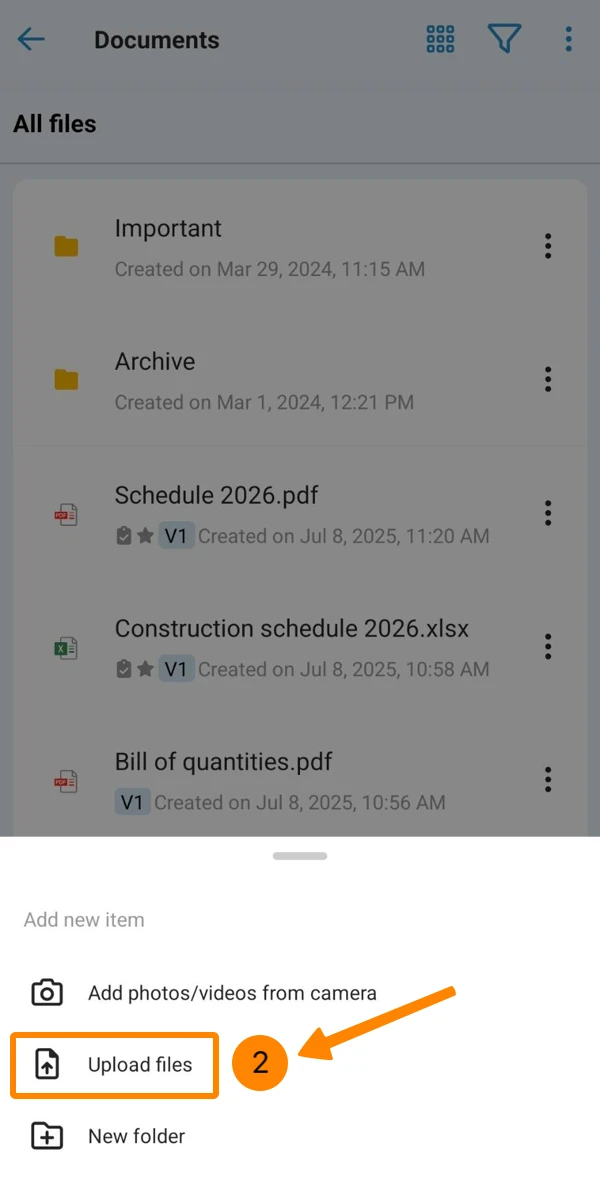
- Select the file(s) in the file browser
Upload Files from Cloud Storage Services
In the Webapp, there are two ways to upload files from cloud storage services:
-
With the integrated buttons
- Only supports single file upload
- No installation of apps is required; just log in once
-
With the local file browser
- Supports multiple file and single folder upload
- Only available if apps are installed on your computer
To upload a file from your cloud storage services (Dropbox, Google Drive or OneDrive) with the integrated buttons:
- Click + Add new item
- Click Upload from Dropbox / Google Drive / OneDrive
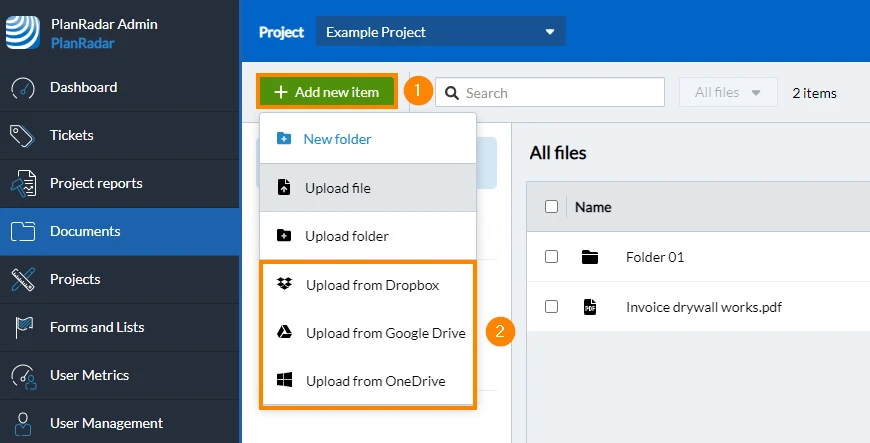
- You need to login to your cloud service (if not already logged in).
- The file browser of your cloud service opens and you can select files.
To upload files or a folder from your cloud storage services with the local file browser buttons:
- Ensure that the desktop app of your cloud storage service is installed on your computer
- Tap +
- Tap Upload Files
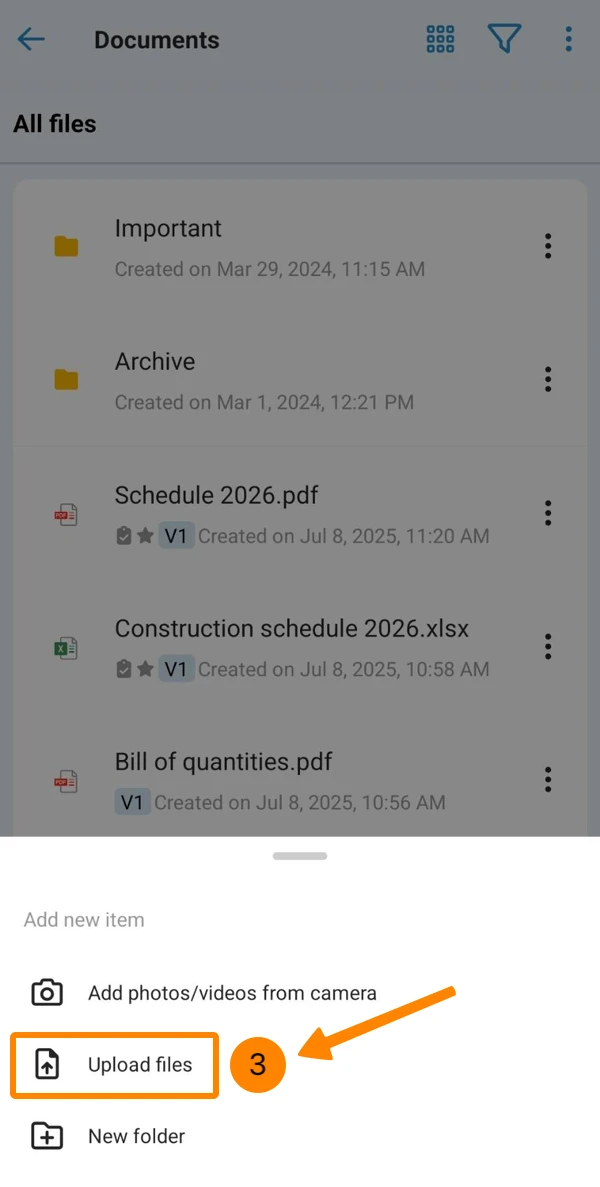
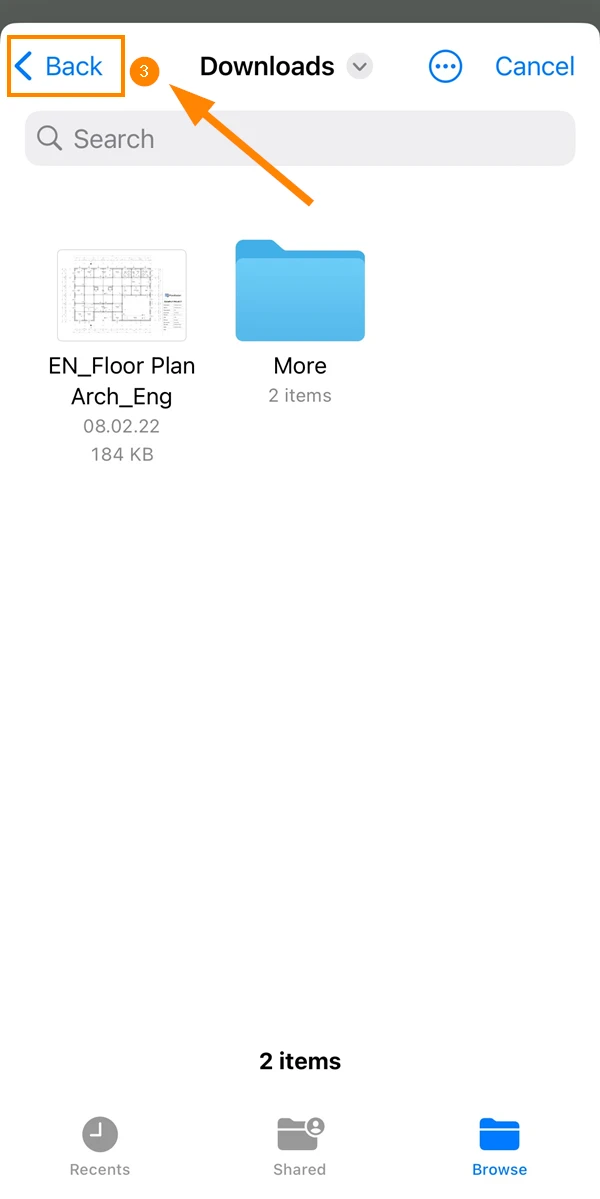
- Tap Back
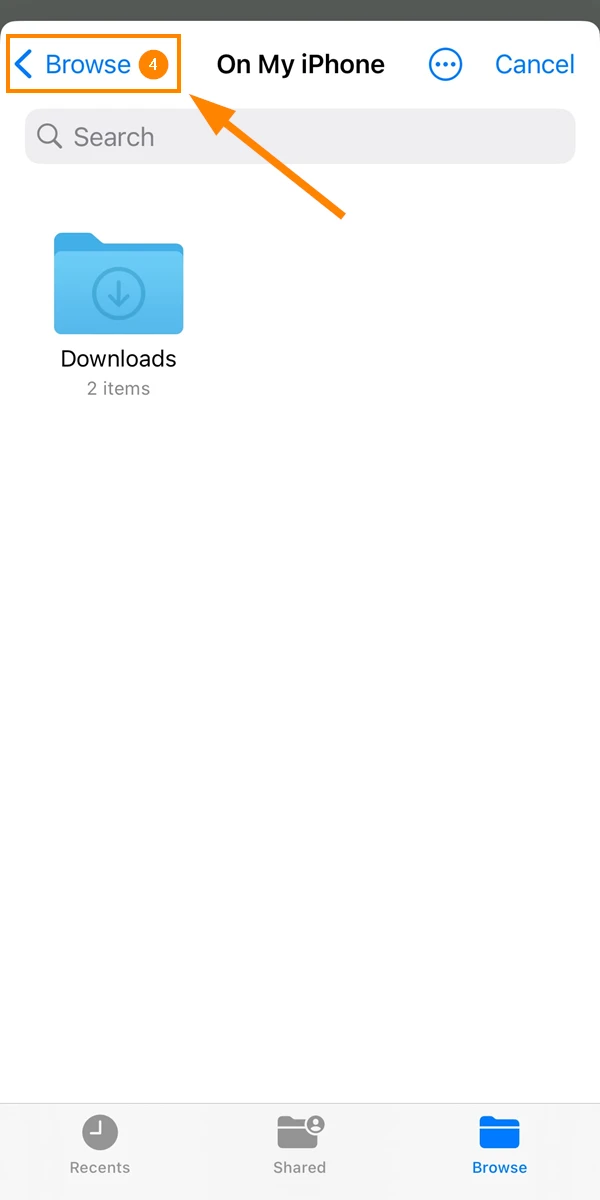
- Tap Browse
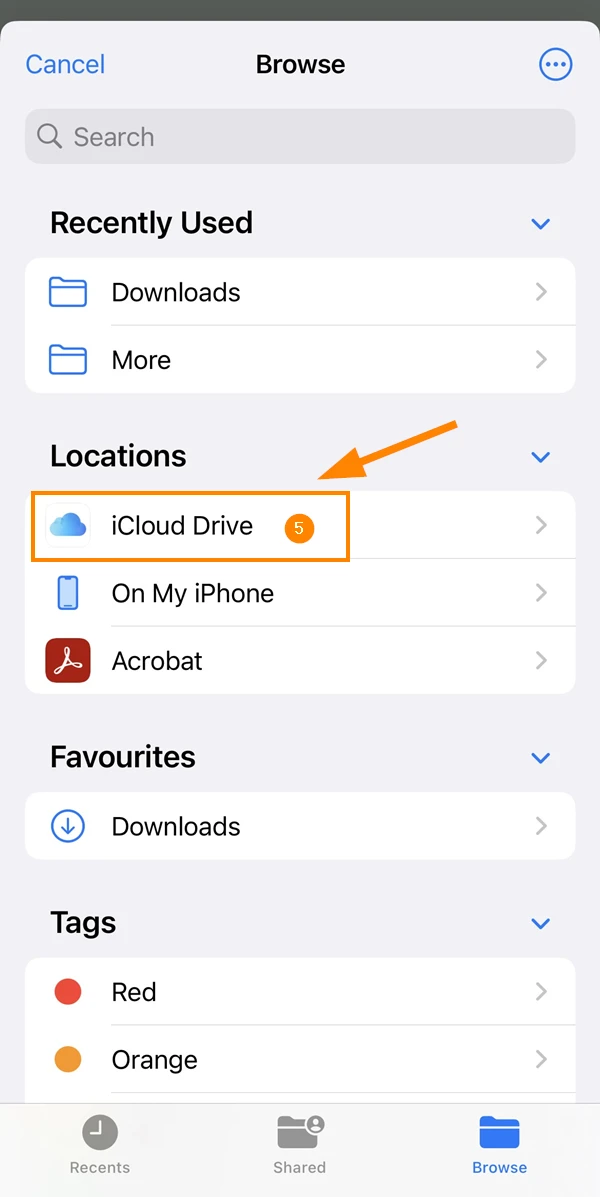
- Open your iCloud Drive or other apps
To upload files or a folder from your cloud storage services with the local file browser buttons:
- Ensure that the desktop app of your cloud storage service is installed on your computer
- Tap +
- Tap Upload Files
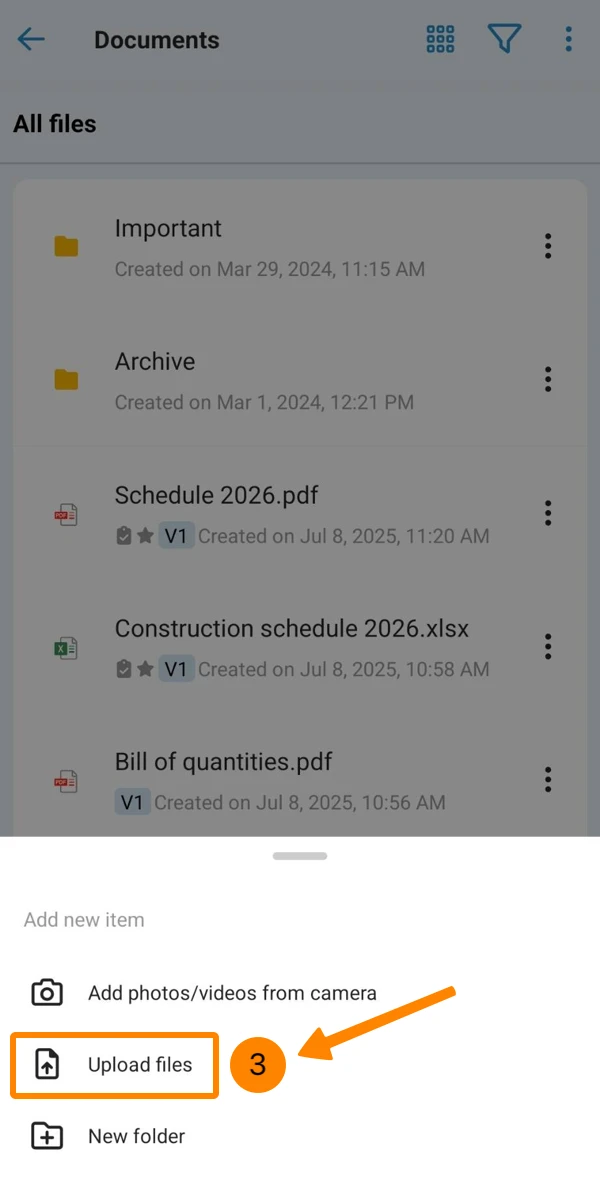
- The following steps may vary depending on your Android device and OS version.
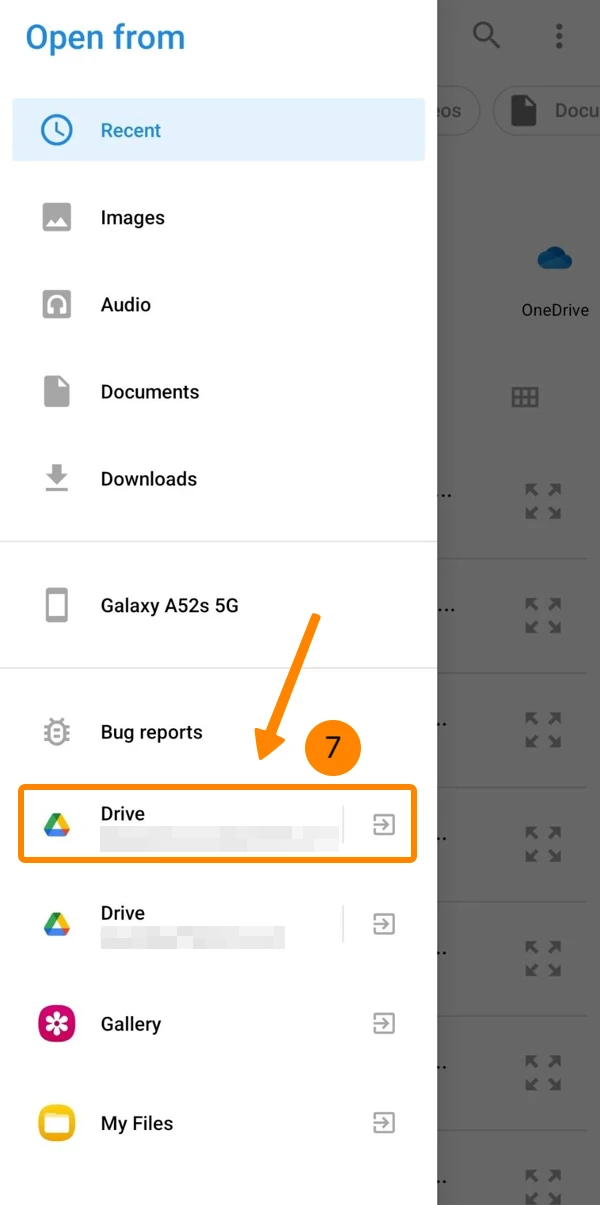
Example of Samsung Galaxy A52s with Android 14. - Scroll through Browse files in other apps
- Tap your cloud storage service app e.g. OneDrive
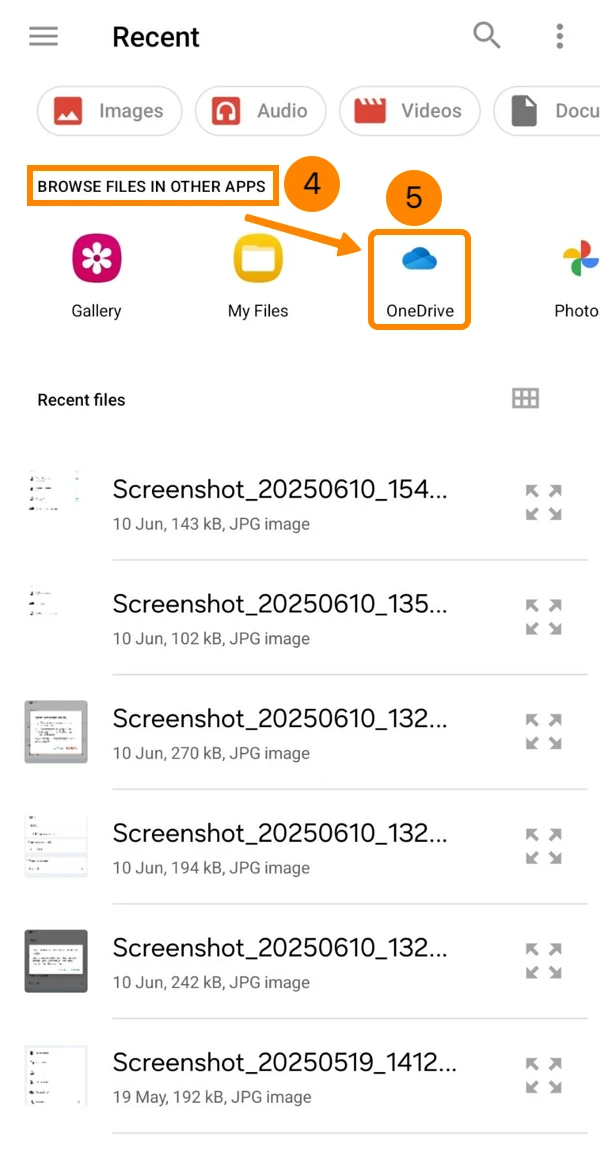
- OR open the menu
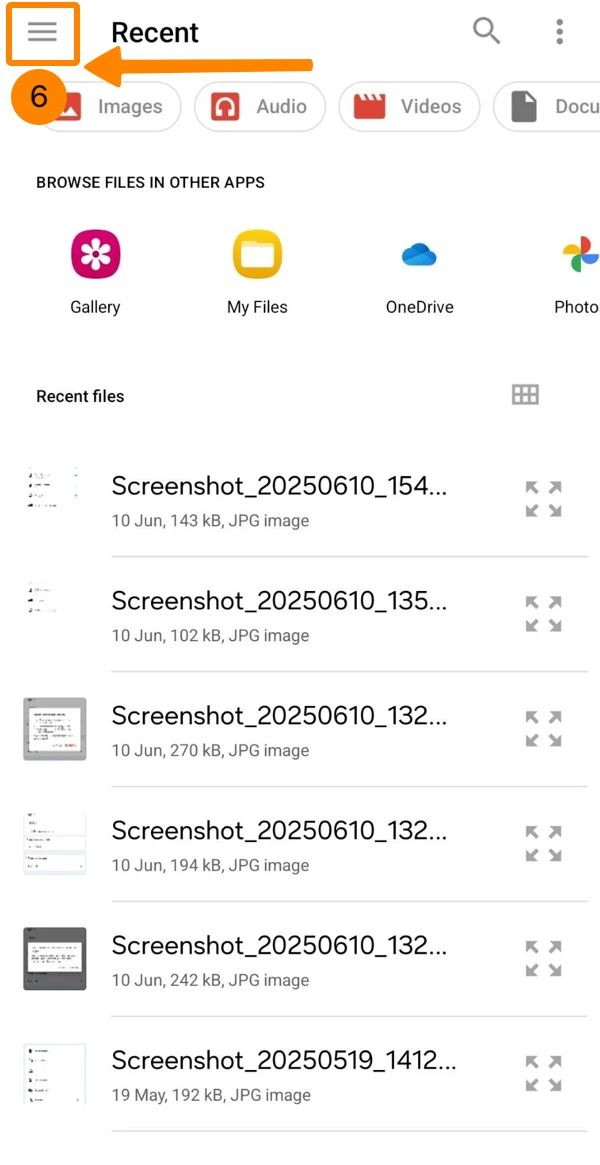
- Tap your cloud storage service app e.g. Drive
Upload Photos/Videos from your Gallery
To upload a photo/video from your phone's gallery:
- Tap +
- Tap Upload photo/video
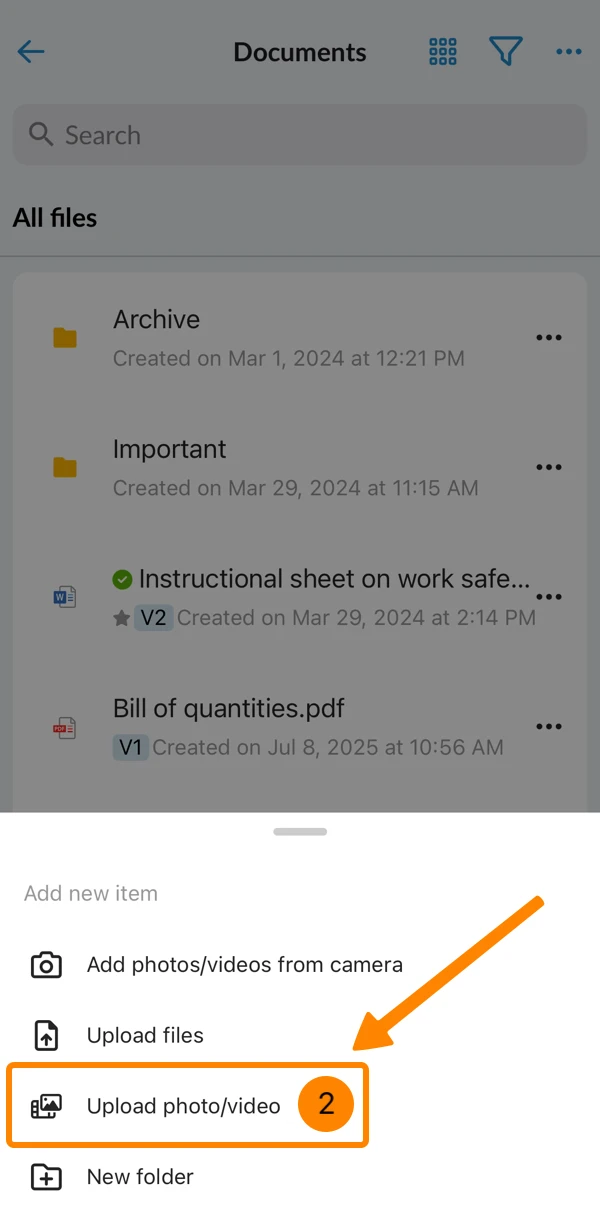
- Tap the photo/video in your phone's gallery
- Tap +
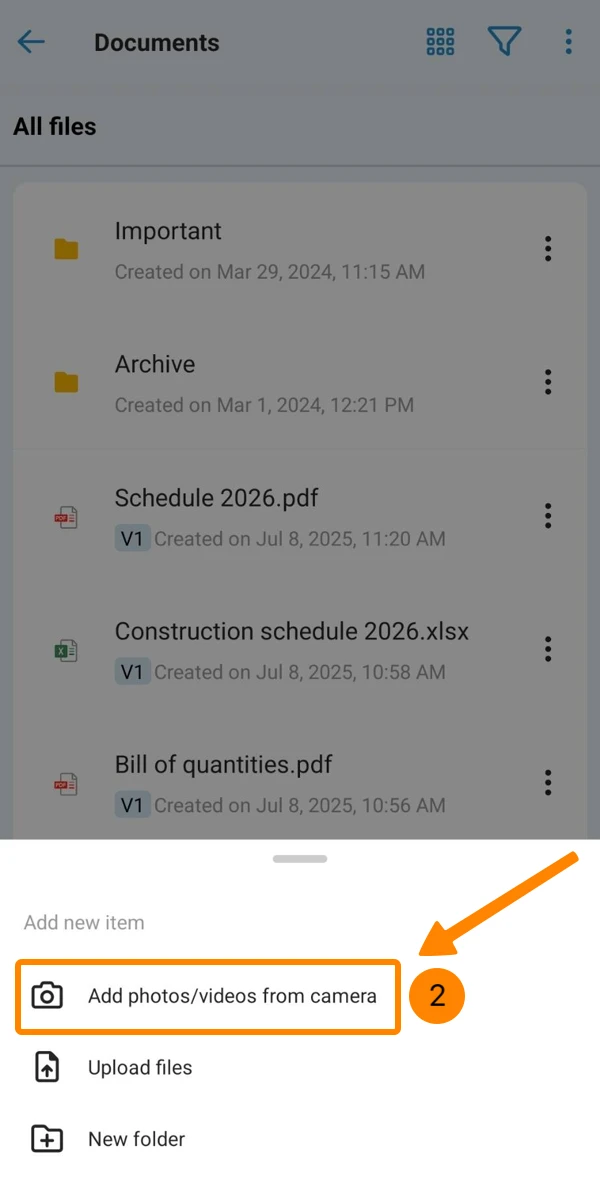
- Tap Add photos/videos from camera
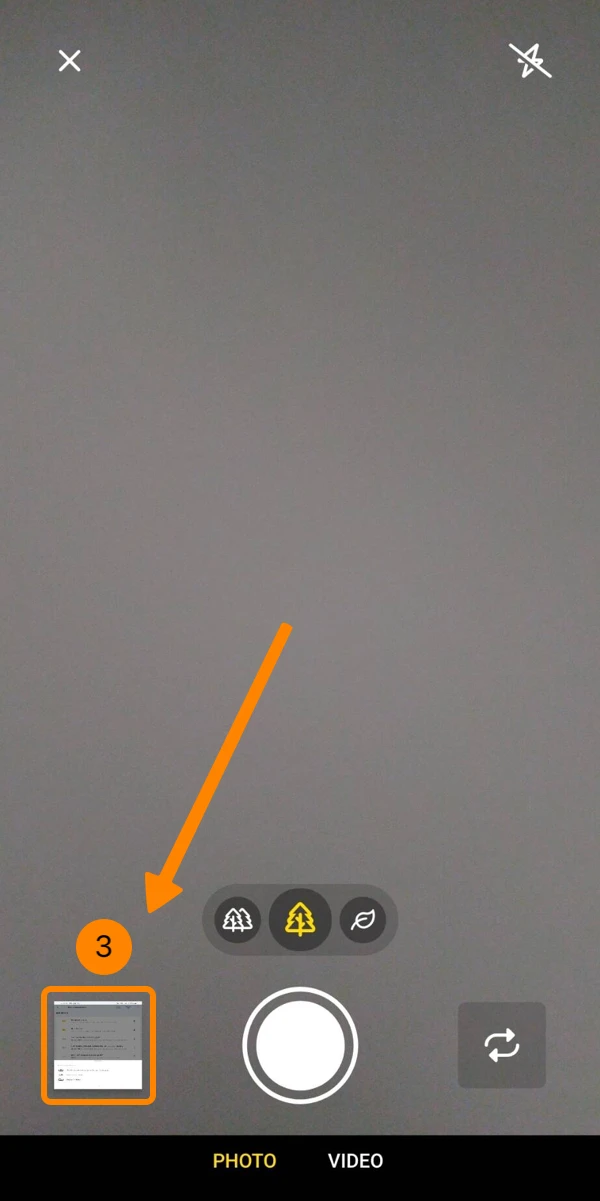
- Tap on the thumbnail of the previous photo
- Tap the photo/video in your phone's gallery
Upload Photos/Videos from your Camera on Mobile
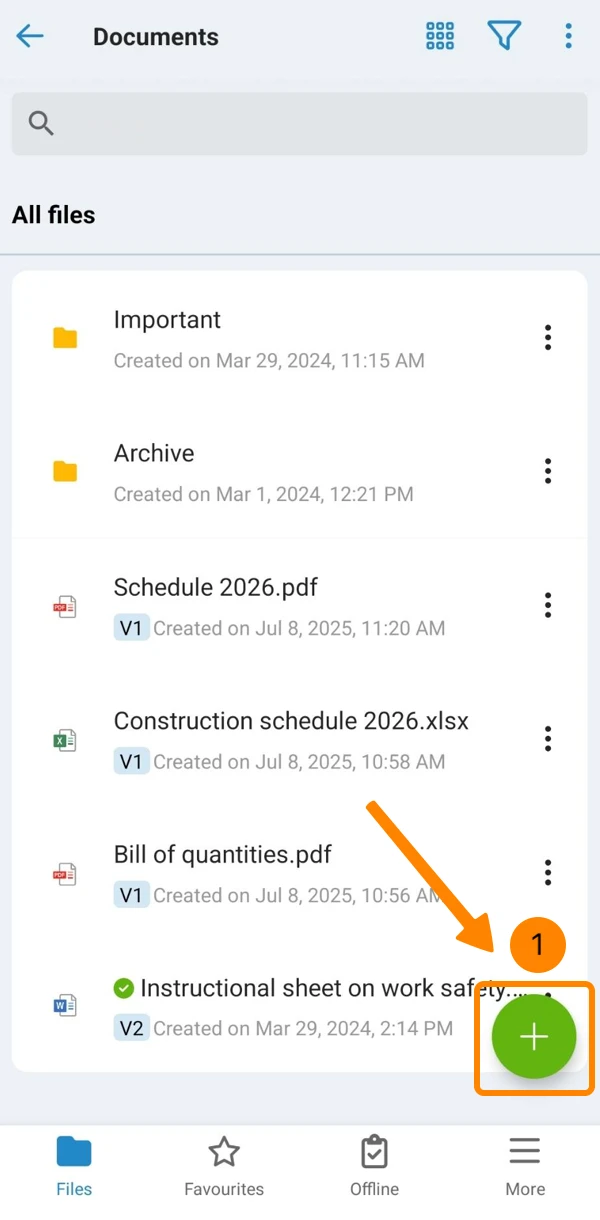
- Tap +
- Tap Add photos/videos from camera
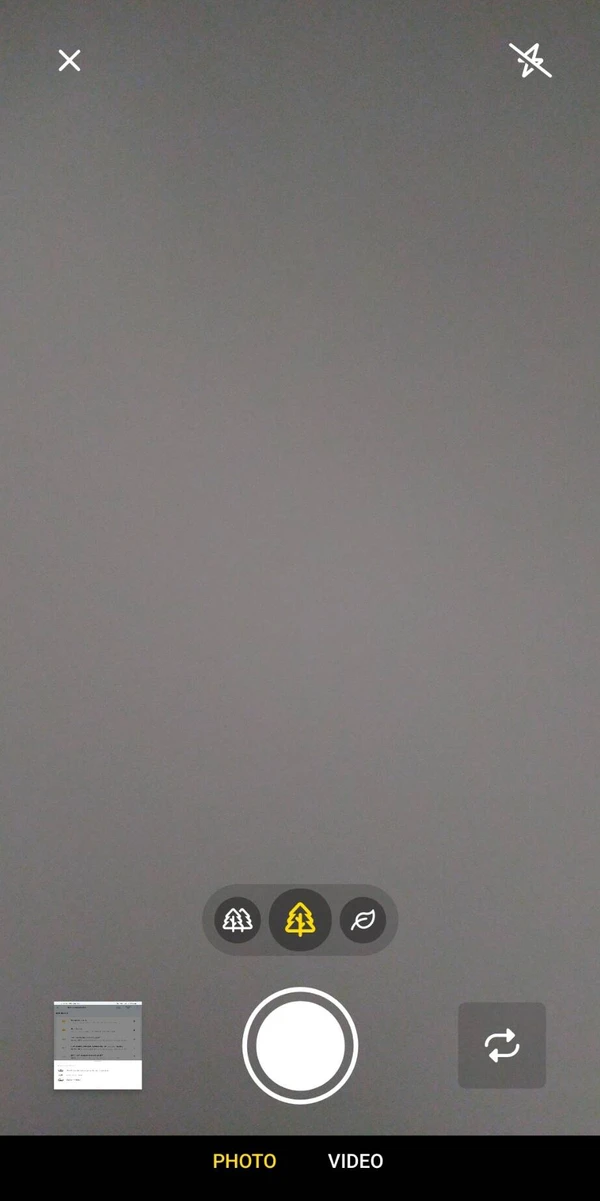
- Take the photo/video
Move Files/Folders
To move files or folders to a destination folder:
Move Single Files/Folders
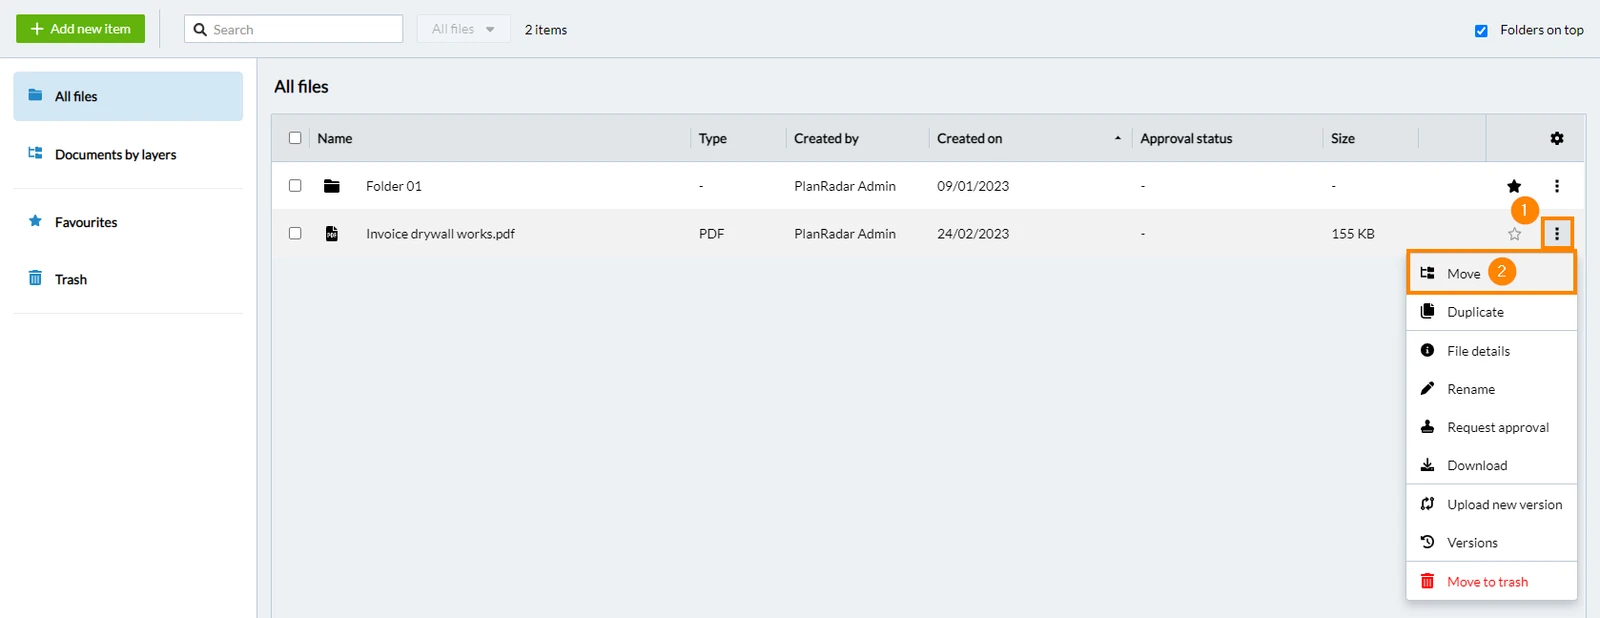
- Click the More icon
- Click Move
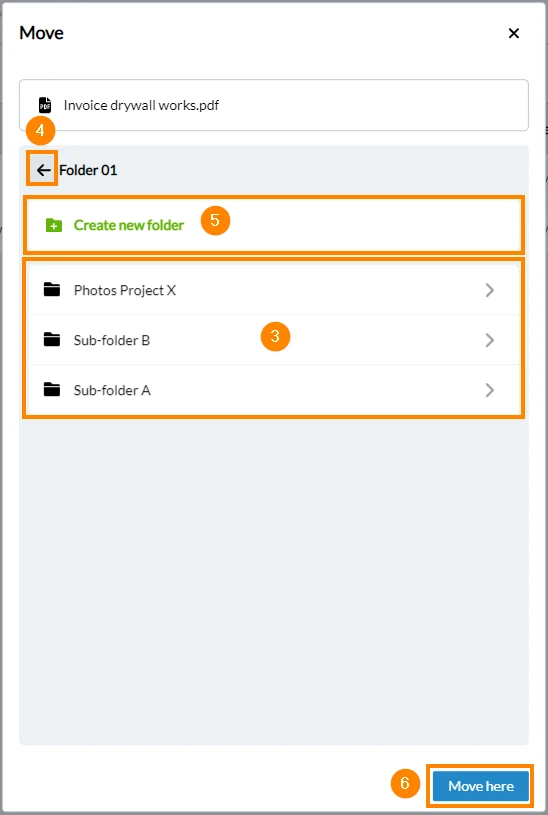
- Select destination folder
- Optional: Click back to navigate to the parent folder
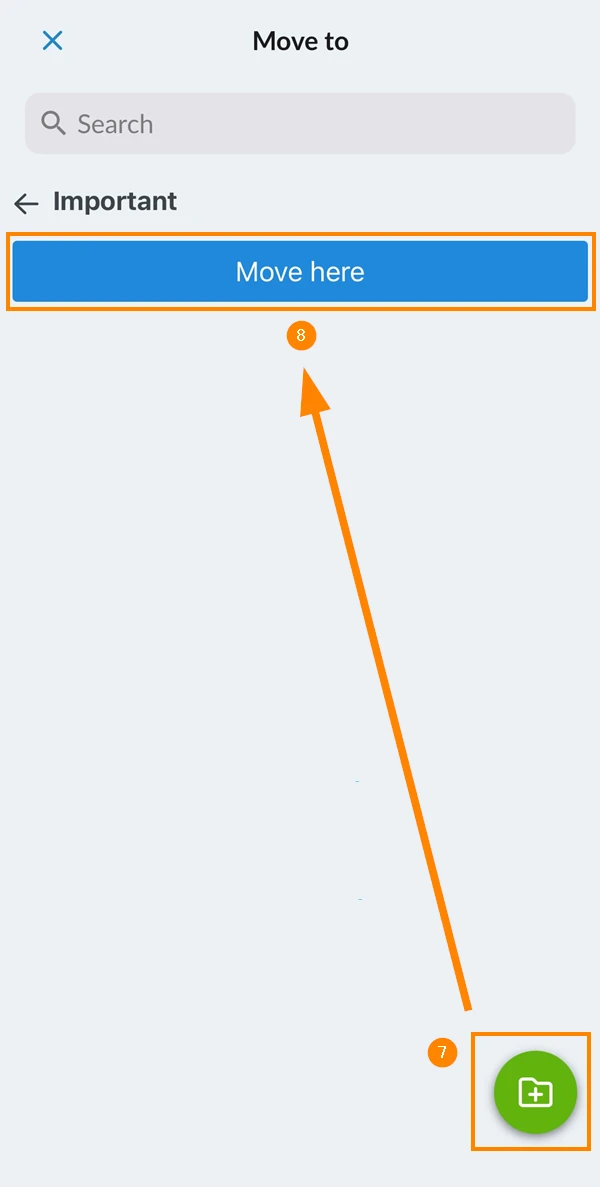
- Optional: Click Create new folder to create a new subfolder in the current folder
- Click Move here
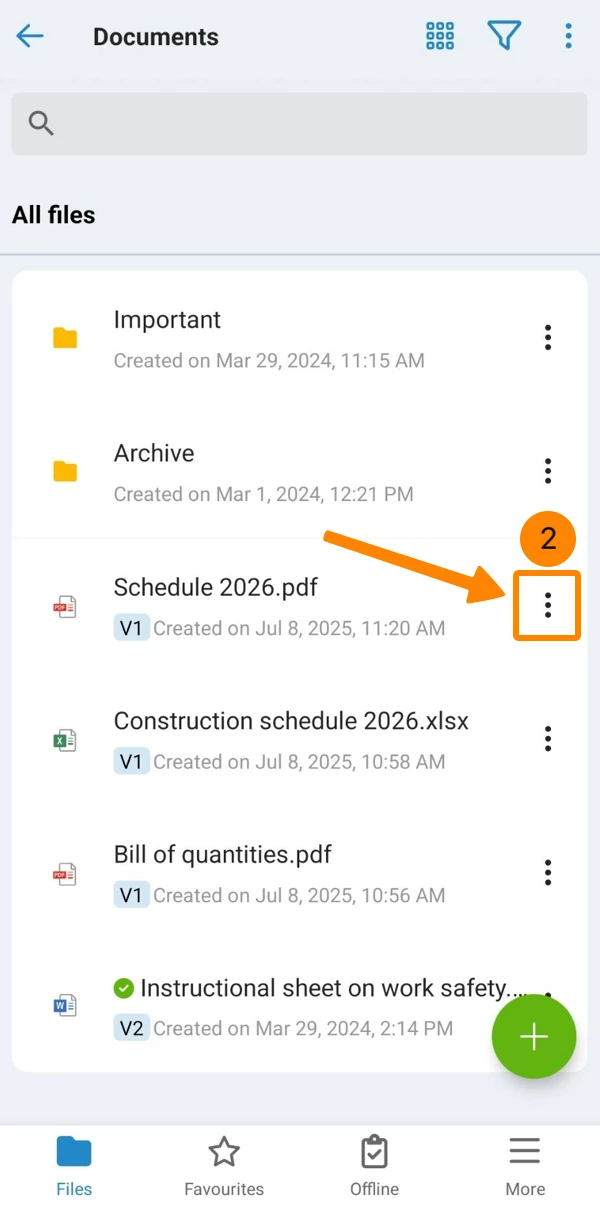
- Navigate to the file that you want to move
- Open the More menu
- Tap <strong">Move to
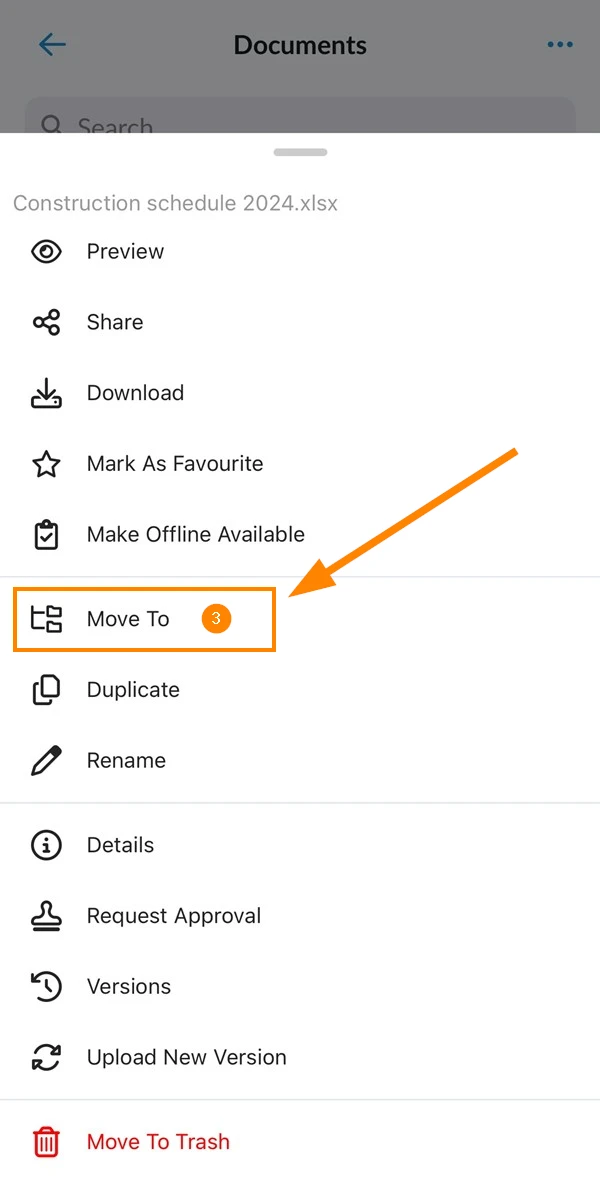
</strong"> - Select the destination folder e.g. Important
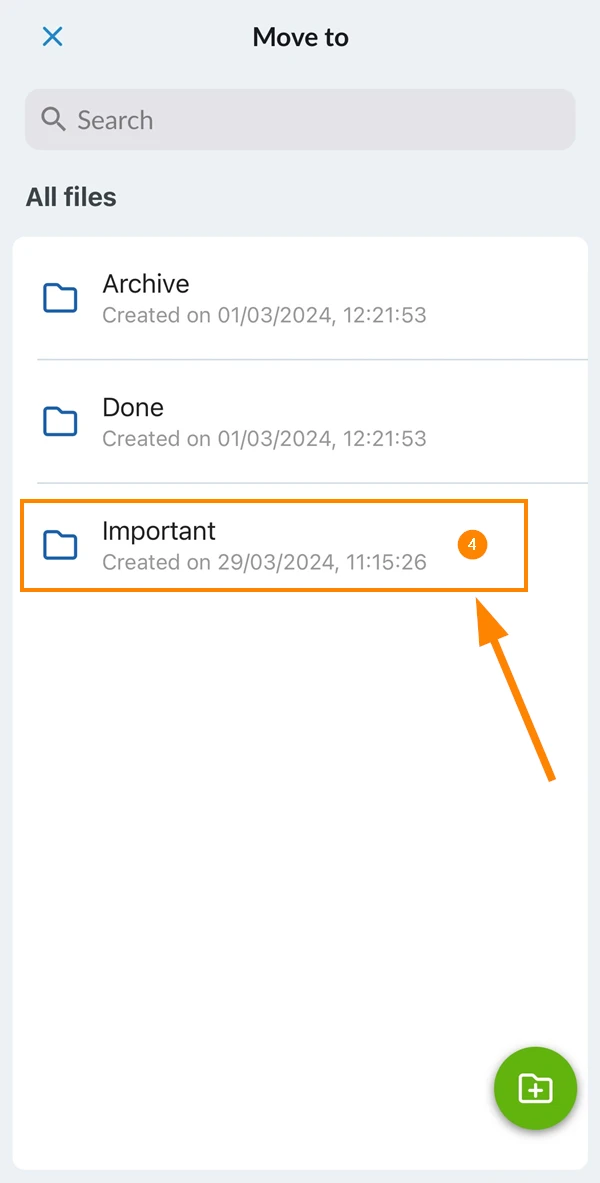
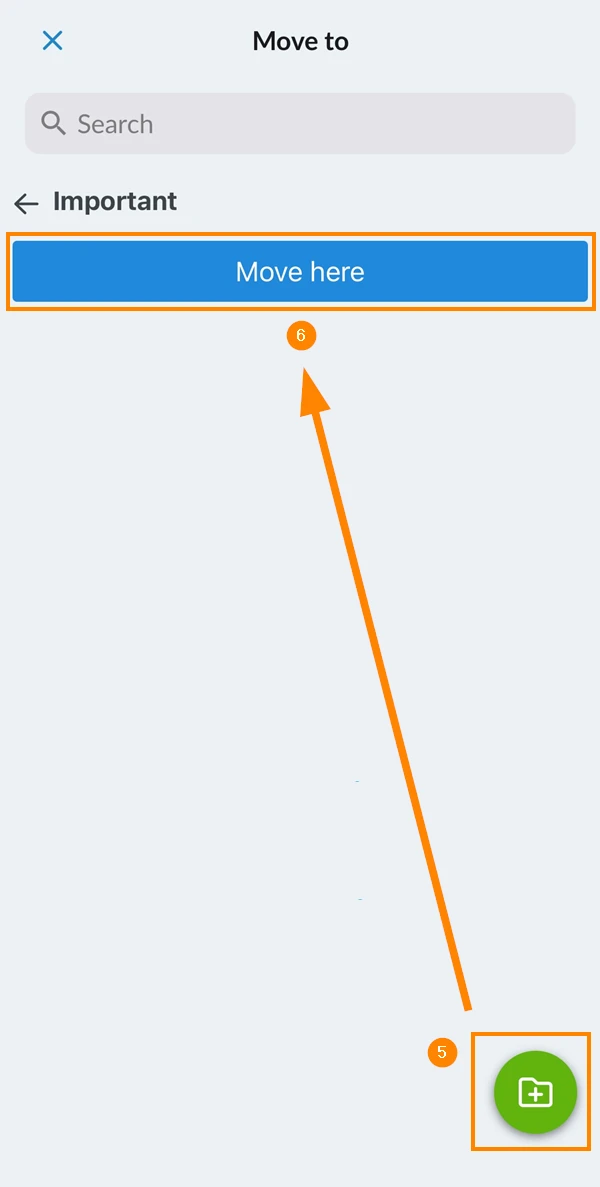
- Optional: Tap the Create Folder icon
- Tap Move here
Move Multiple Files/Folders
- Select the checkboxes for each file or folder
- Optional: Select the select all checkbox
- Click Bulk actions
- Click Move

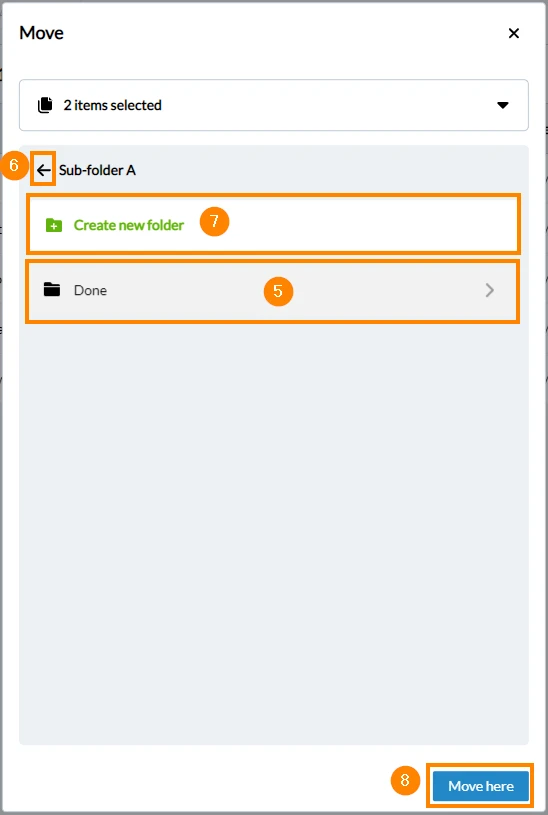
- Select destination folder
- Optional: Click back to navigate to the parent folder
- Optional: Click Create new folder to create a new subfolder in the current folder
- Click Move here
- Open the More menu
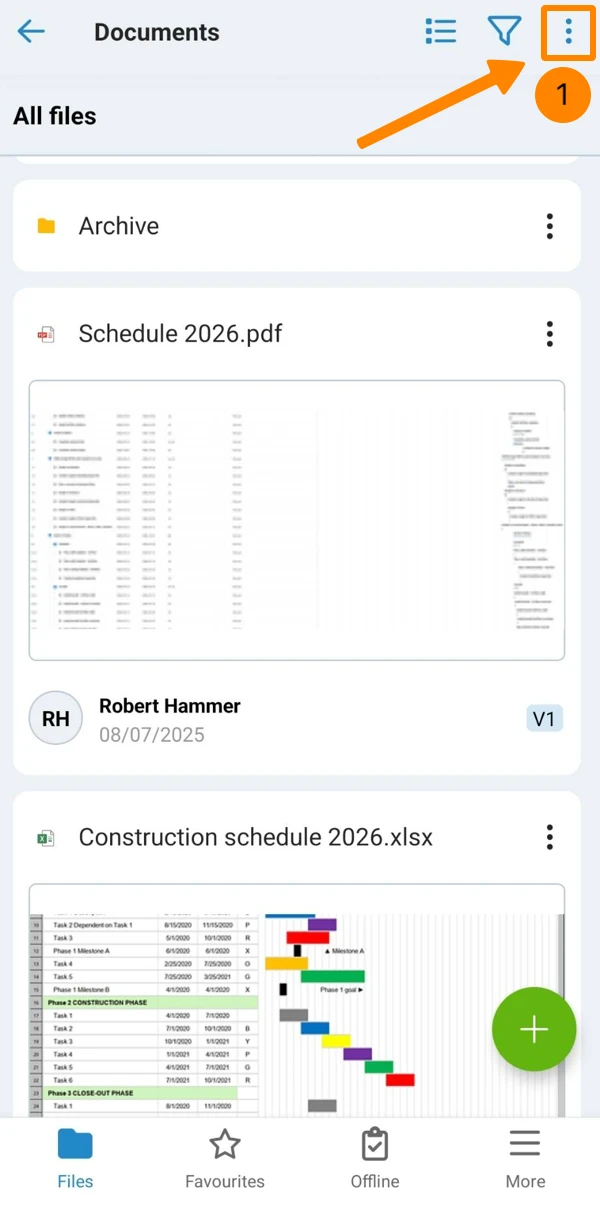
- Tap Select items
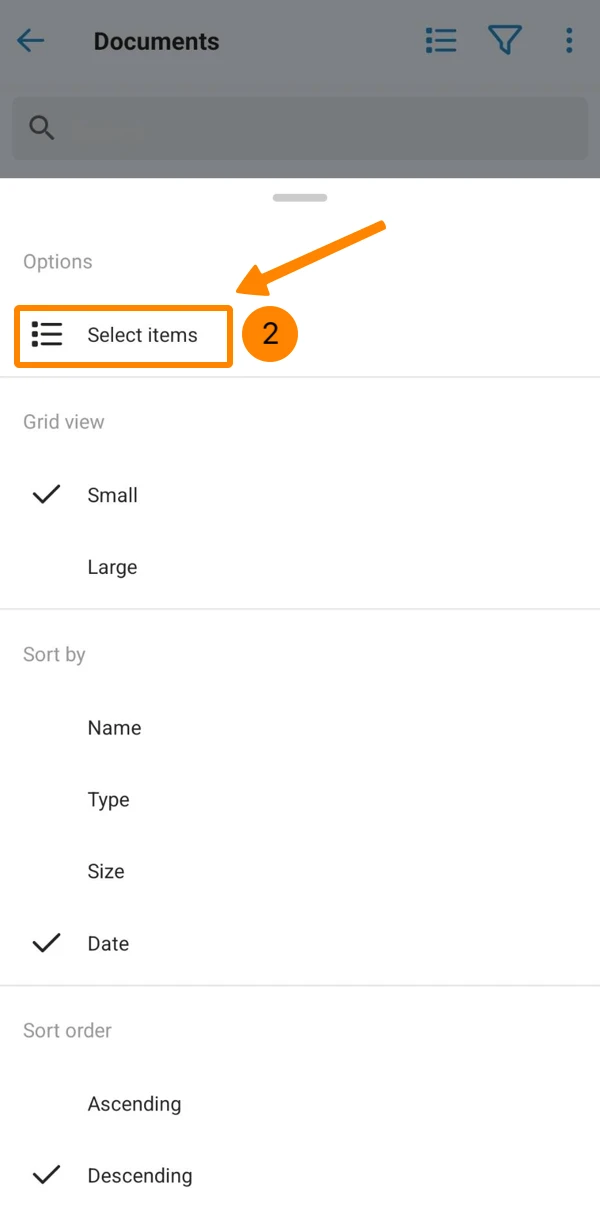
- Tap the items to select them
- Tap Actions
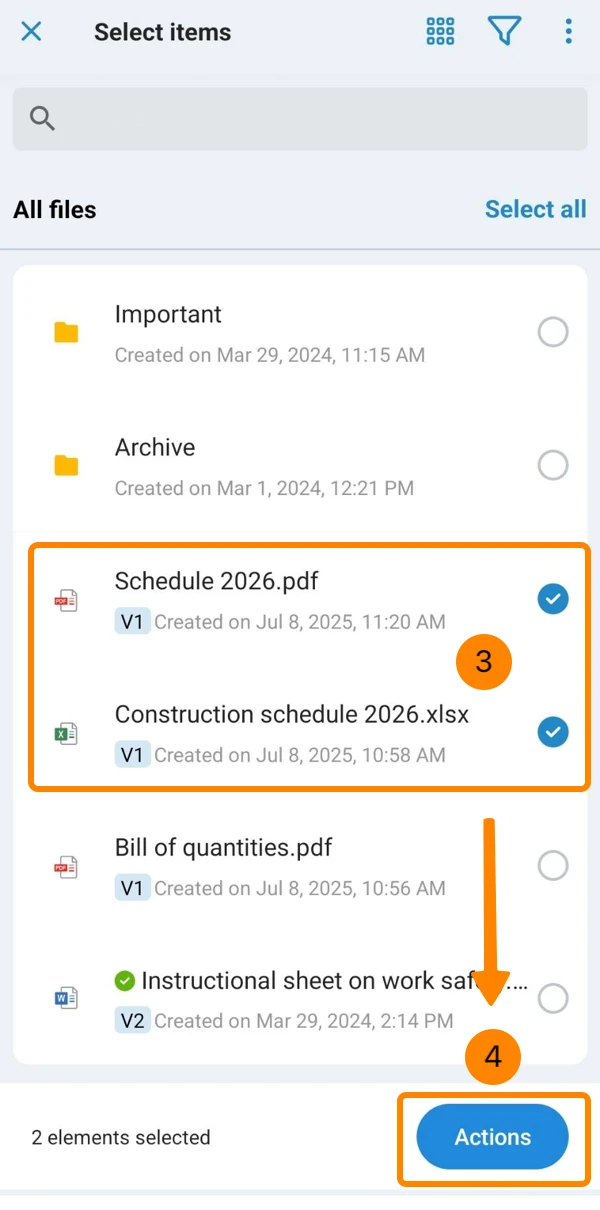
- Tap Move To
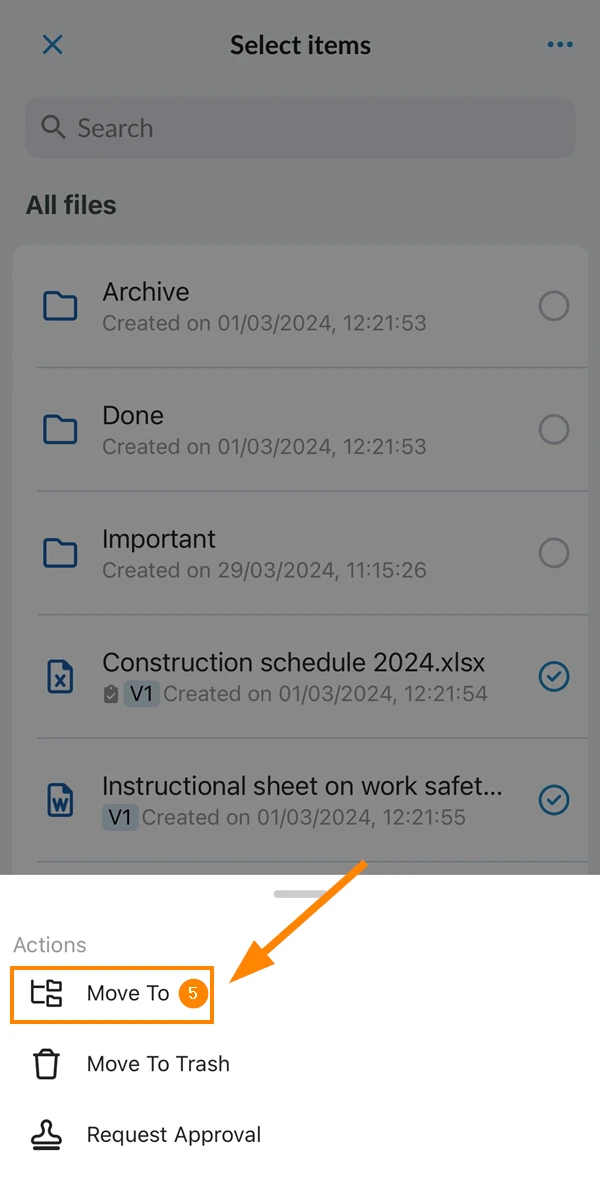
- Select the destination folder e.g. Important
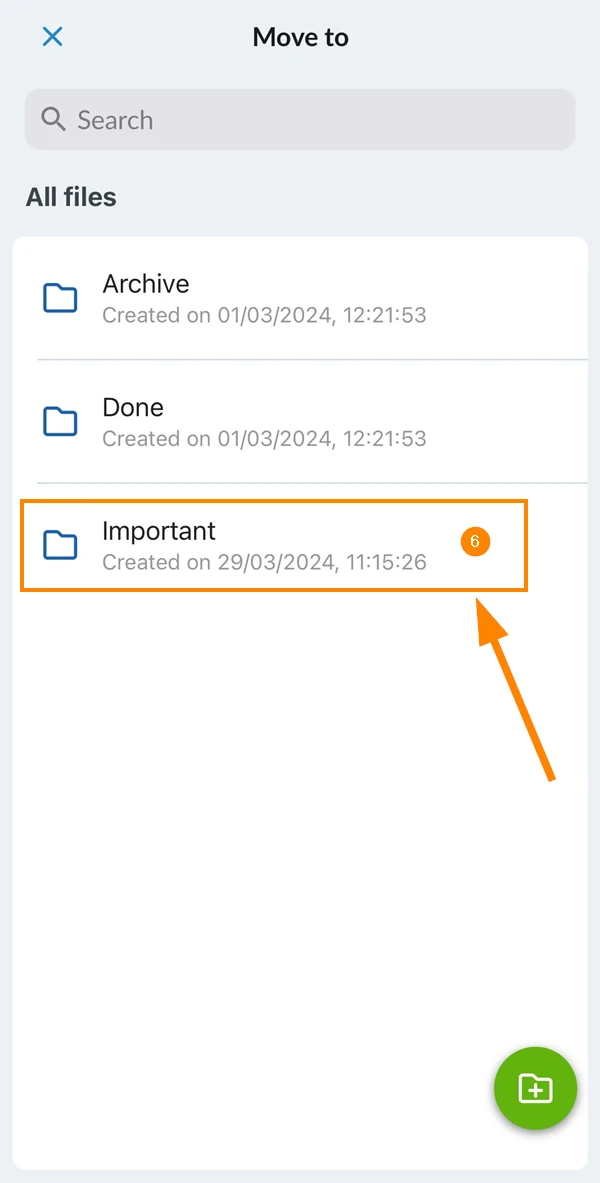
- Optional: Tap the Create Folder icon
- Tap Move here
Duplicate a File
Duplicate a single file to create an exact copy. If versioning is used, the version history will not be duplicated and only the current version will be used for the new file.
Navigate to the file you want to duplicate.
- Click More
- Click Duplicate
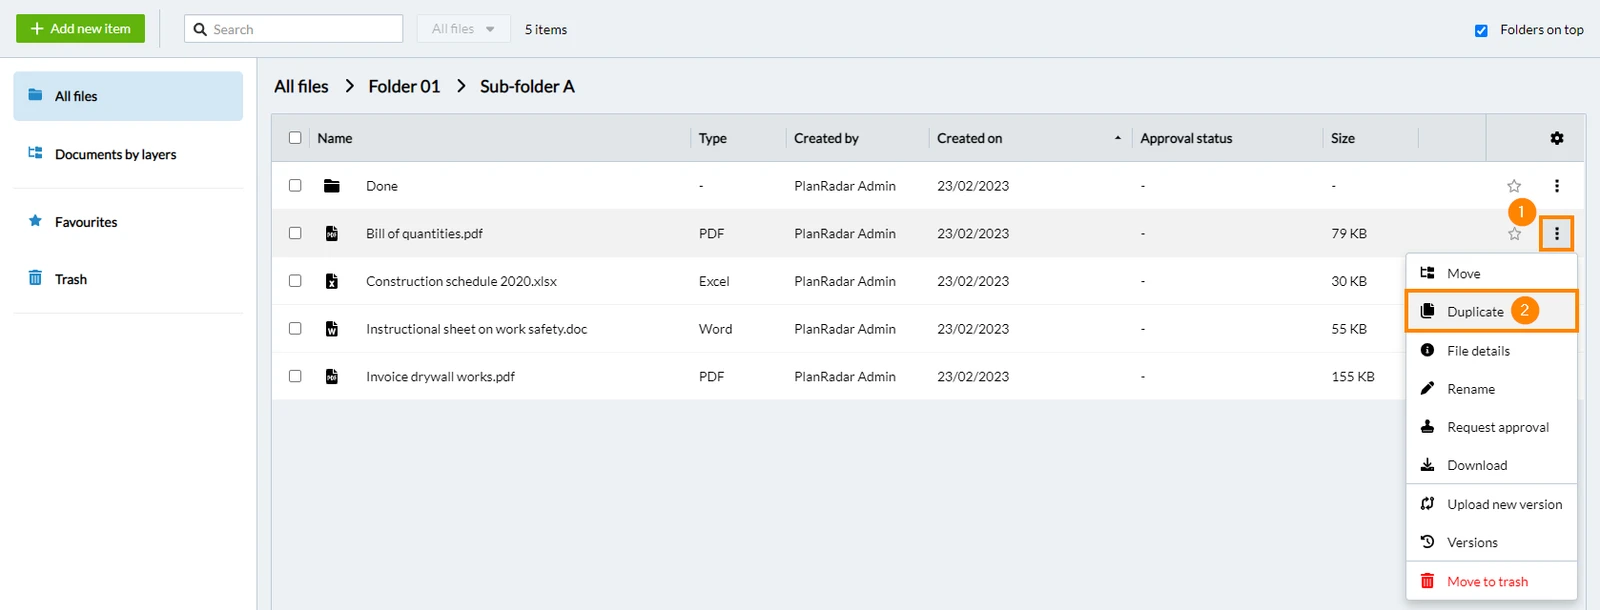
- Enter new file name
- Click Duplicate
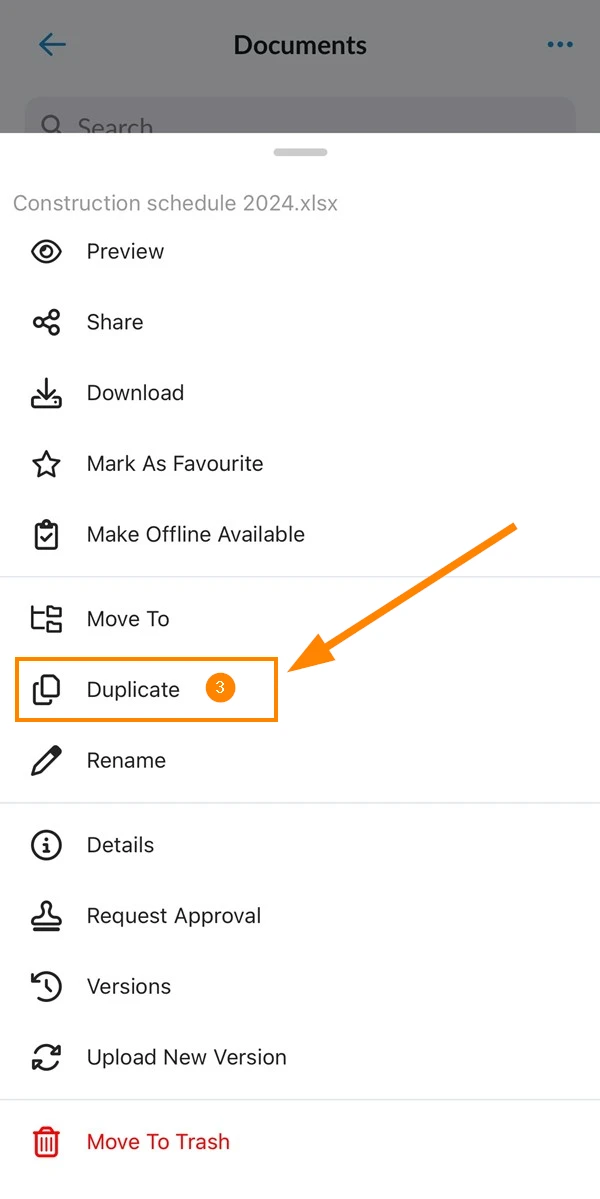
- Navigate to the file that you want to duplicate
- Open the More menu
- Tap Duplicate
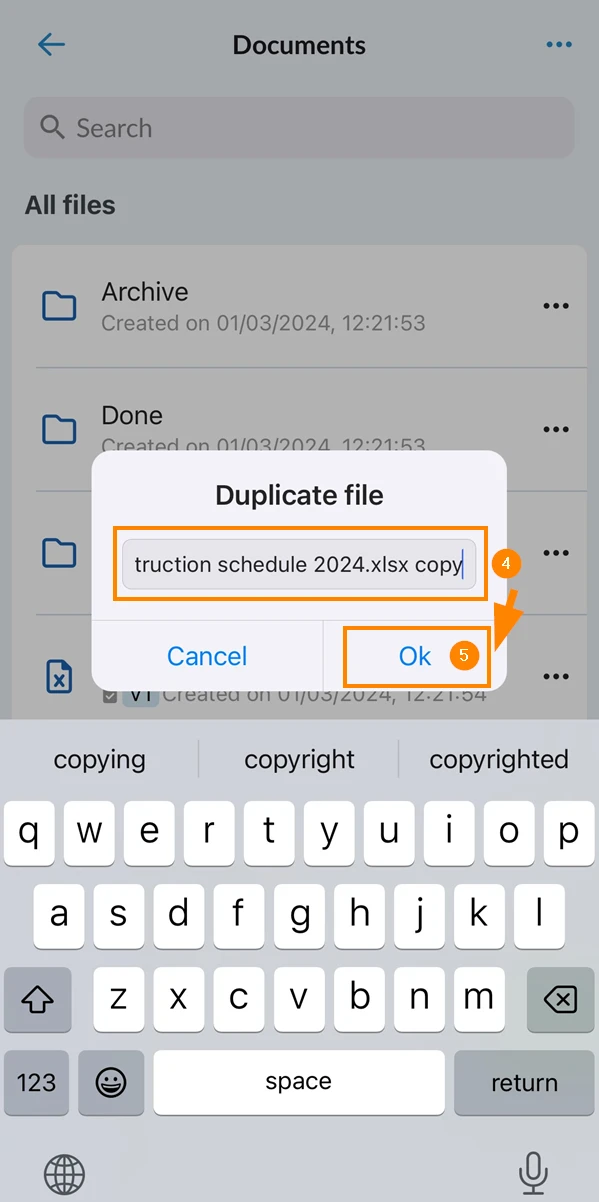
- Enter the new file name
- Tap Ok
Rename a File/Folder
- Click More
- Click Rename
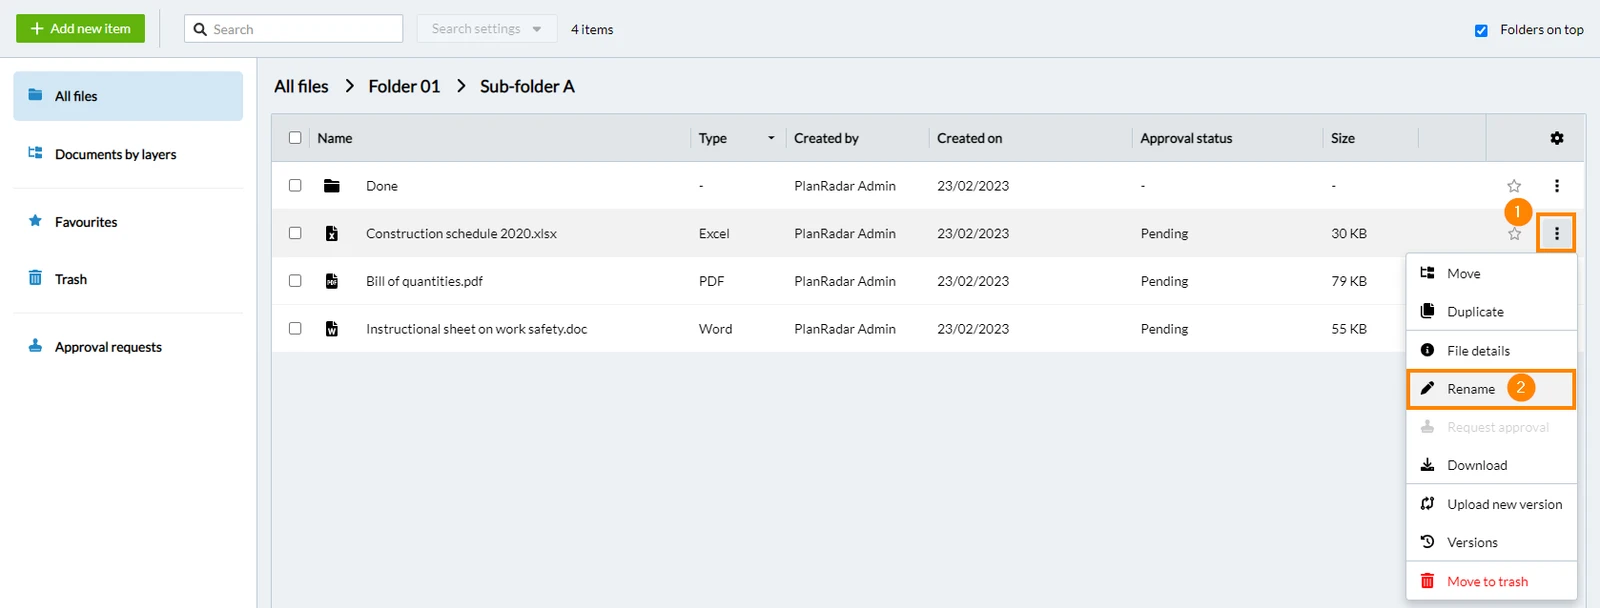
- Enter the new name
- Click Rename
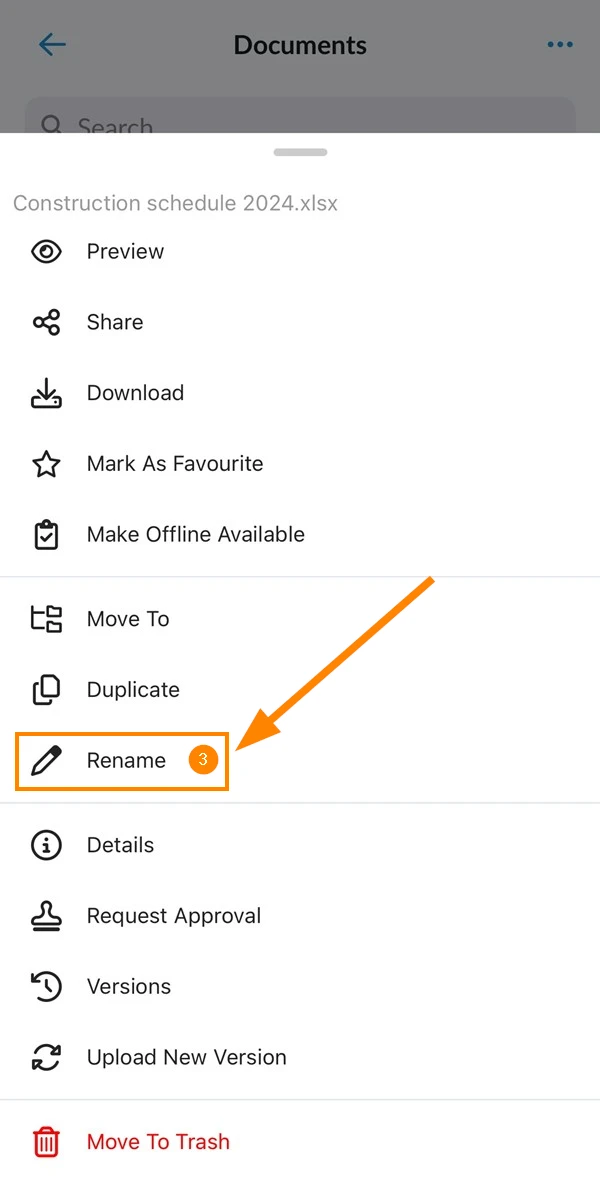
- Navigate to the file that you want to rename
- Open the More menu
- Tap Rename
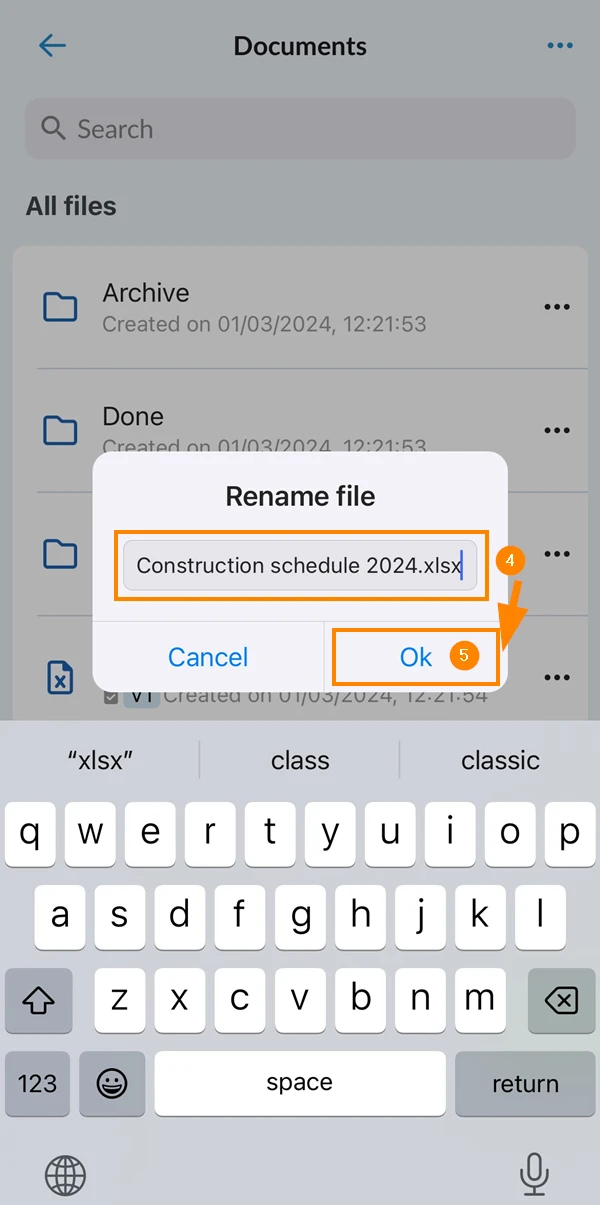
- Enter a new name
- Tap Ok to confirm
Delete & Restore Files/Folders
Files and folders are not deleted immediately, instead they are moved to trash first.
From there they can be restored or permanently deleted. Currently, items in trash are not deleted automatically.
Move a Single File/Folder to Trash
Navigate to the file or folder you want to move to trash.
- Click More
- Click Move to trash
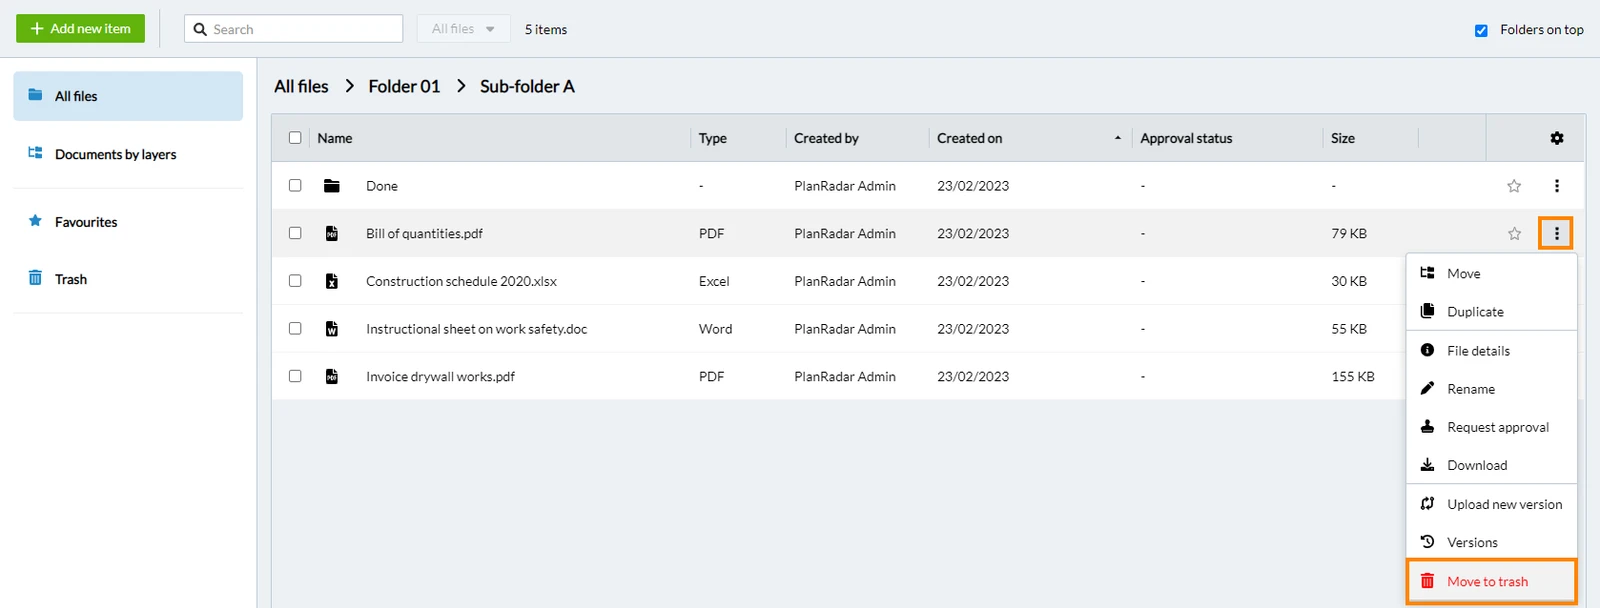
- Confirm
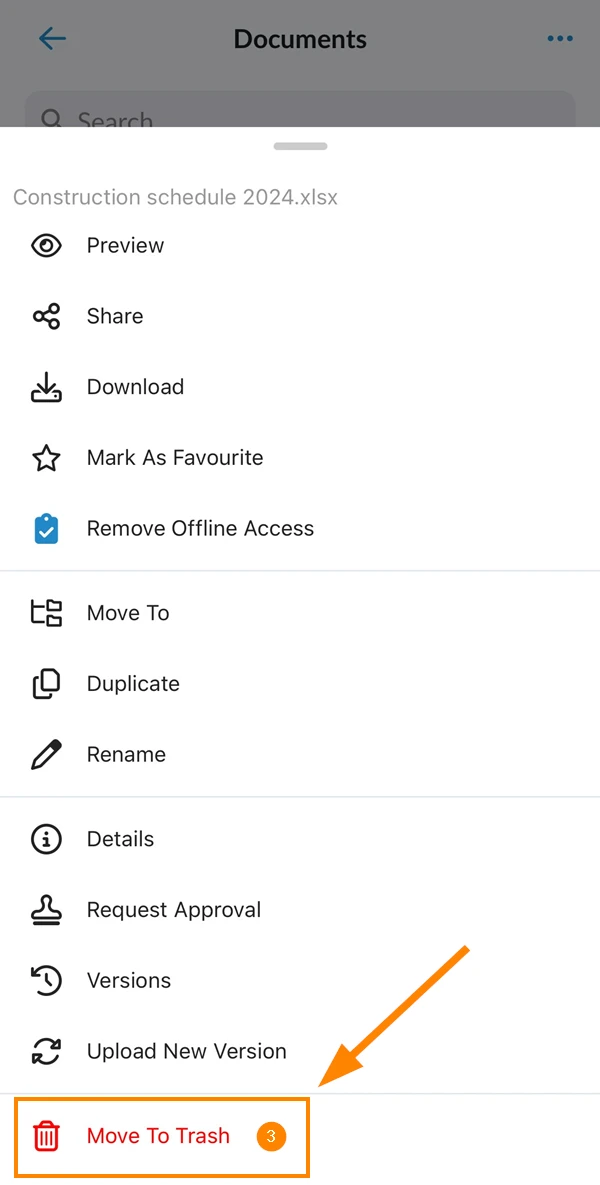
- Navigate to the file/folder that you want to move to trash
- Open the More menu
- Tap Move to Trash (on Android scroll down first)
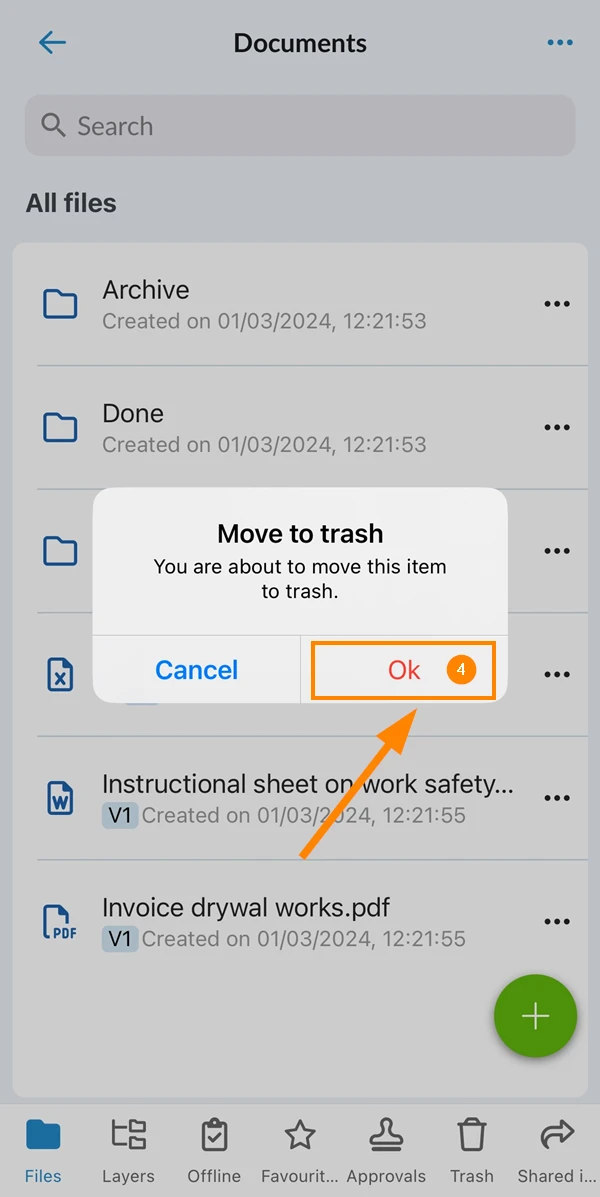
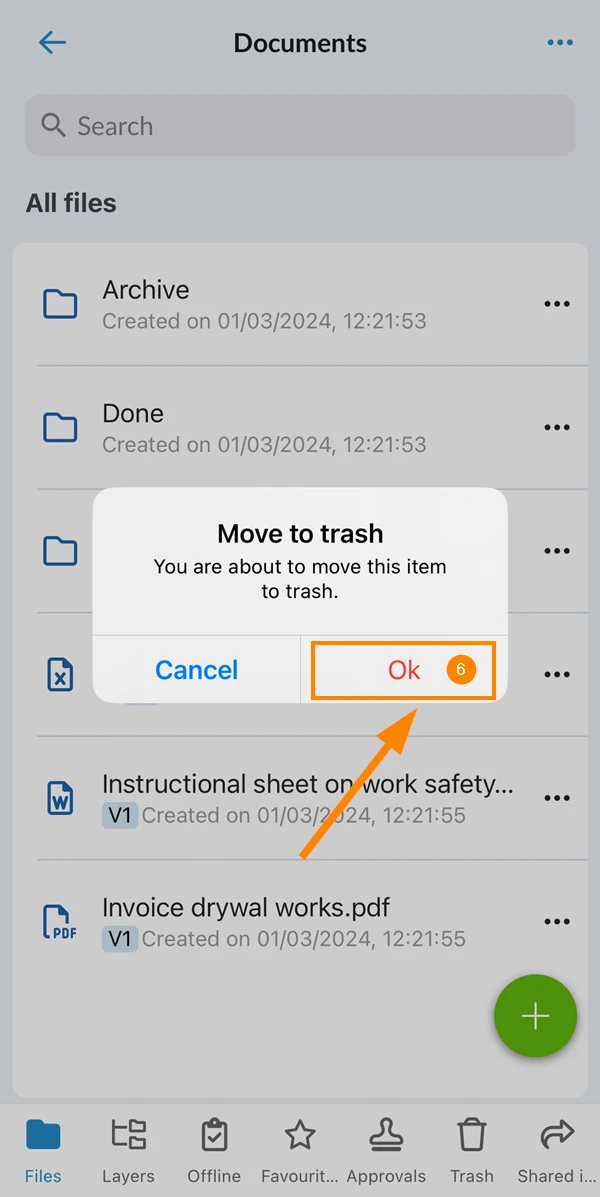
- Tap Ok to confirm
Move Multiple Files/Folders to Trash
- Select the checkboxes for each file or folder
- Optional: Select the select all checkbox
- Click Bulk actions
- Click Move to trash
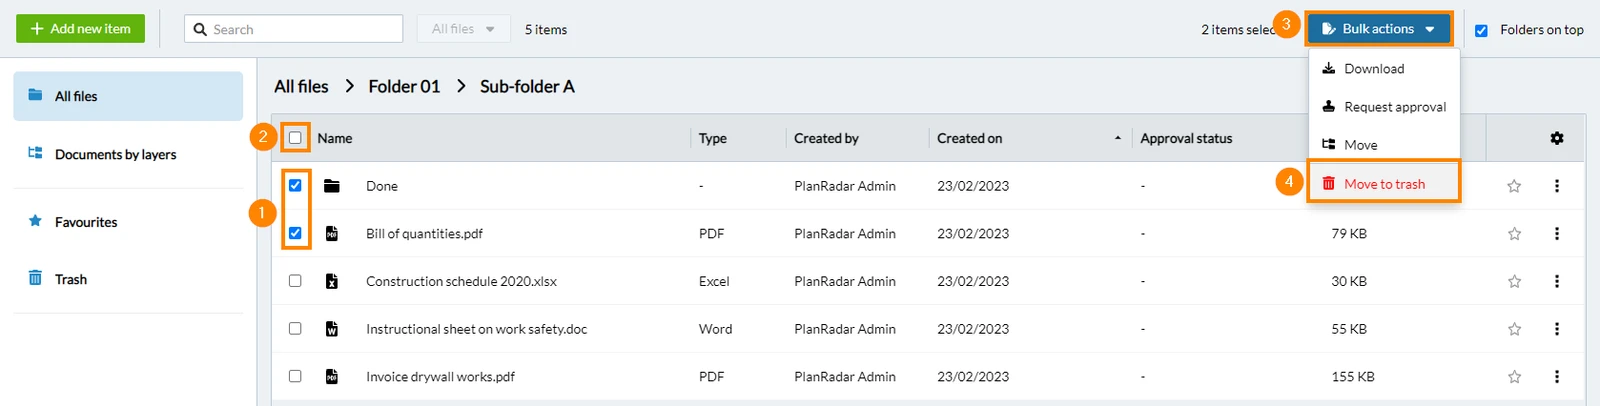
- Confirm
- Open the More menu
- Tap Select items
- Tap the items to select them
- Tap Actions
- Tap Move To
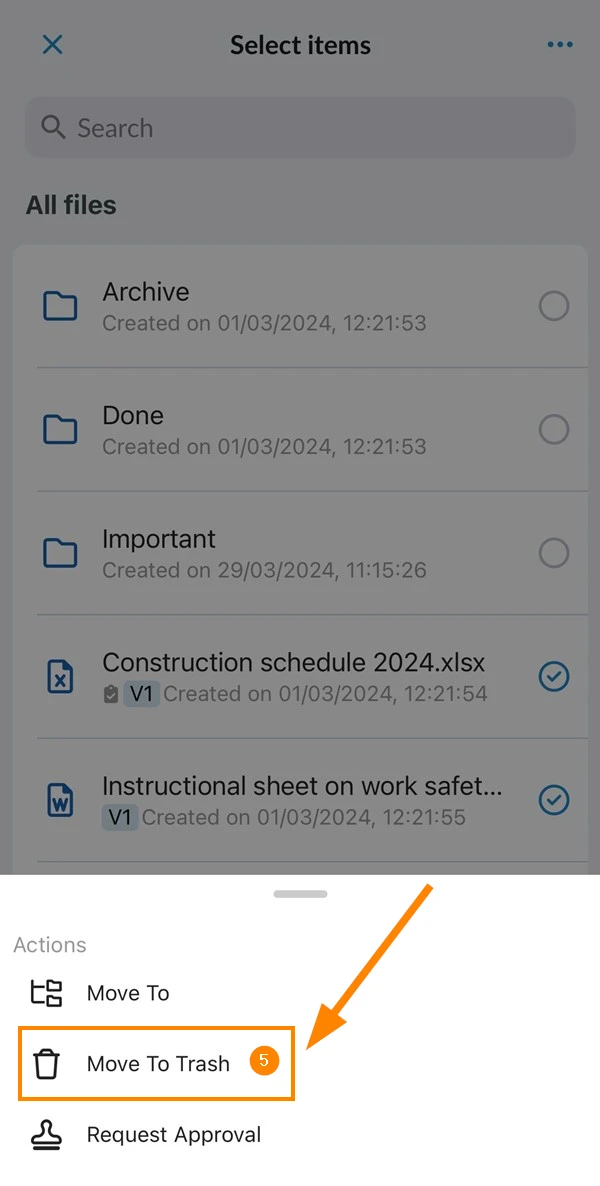
- Tap Ok to confirm
Restore a Single File/Folder
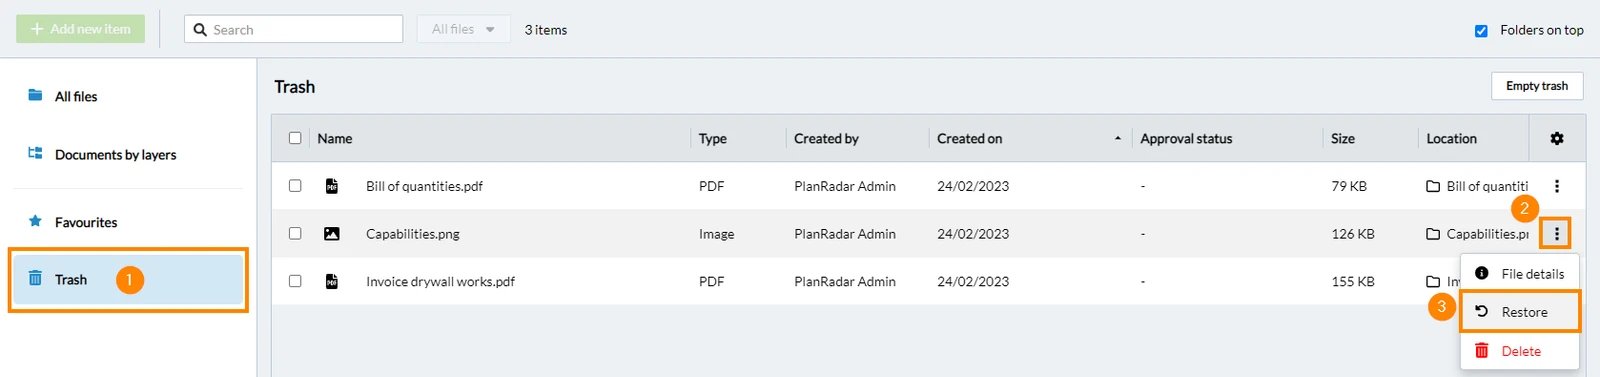
- Click Trash
- Click More
- Click Restore
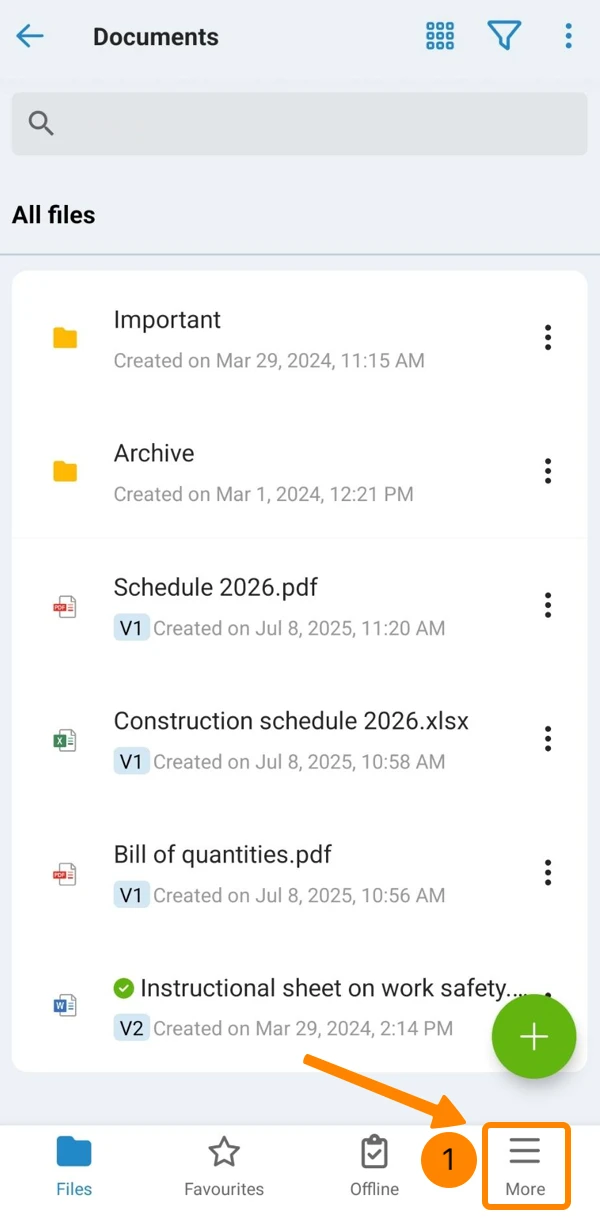
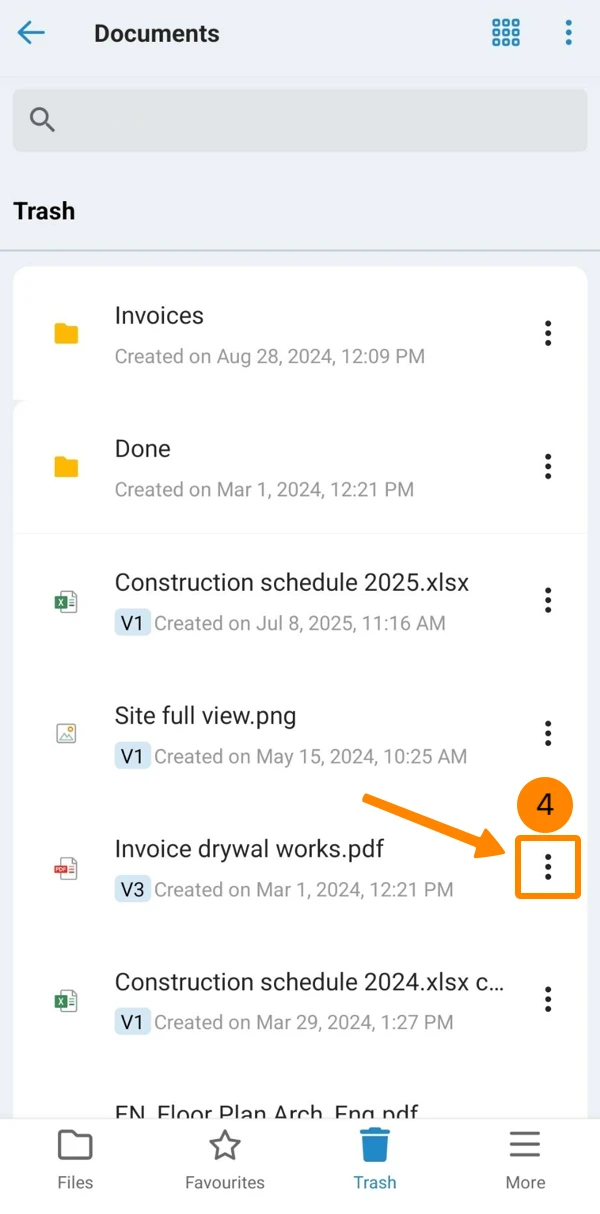
- Open the More menu
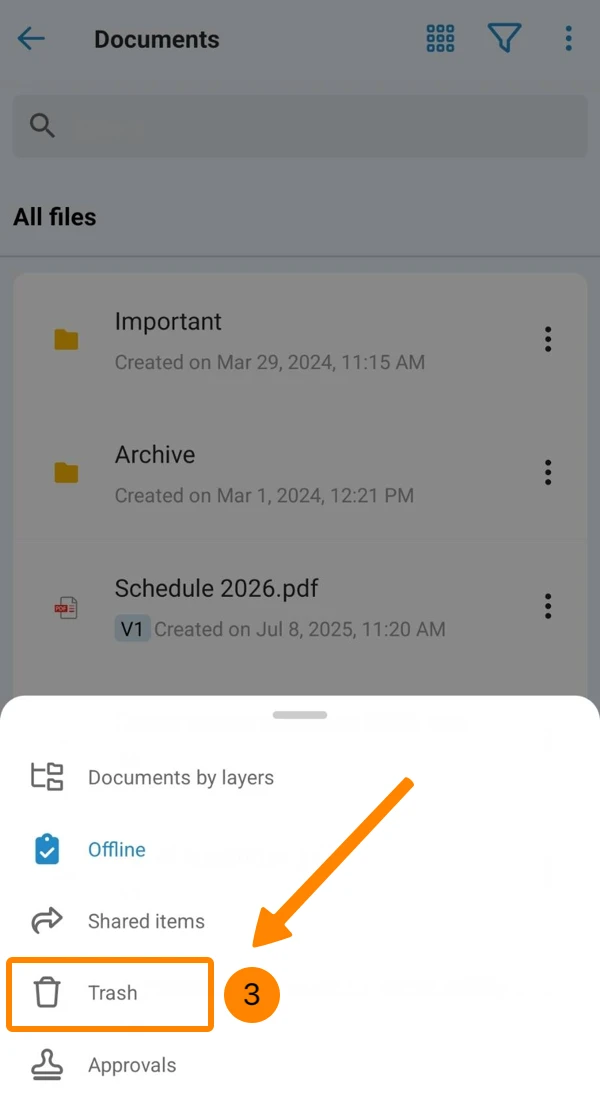
- Tap Trash
- Navigate to the file that you want to restore
- Open the More menu
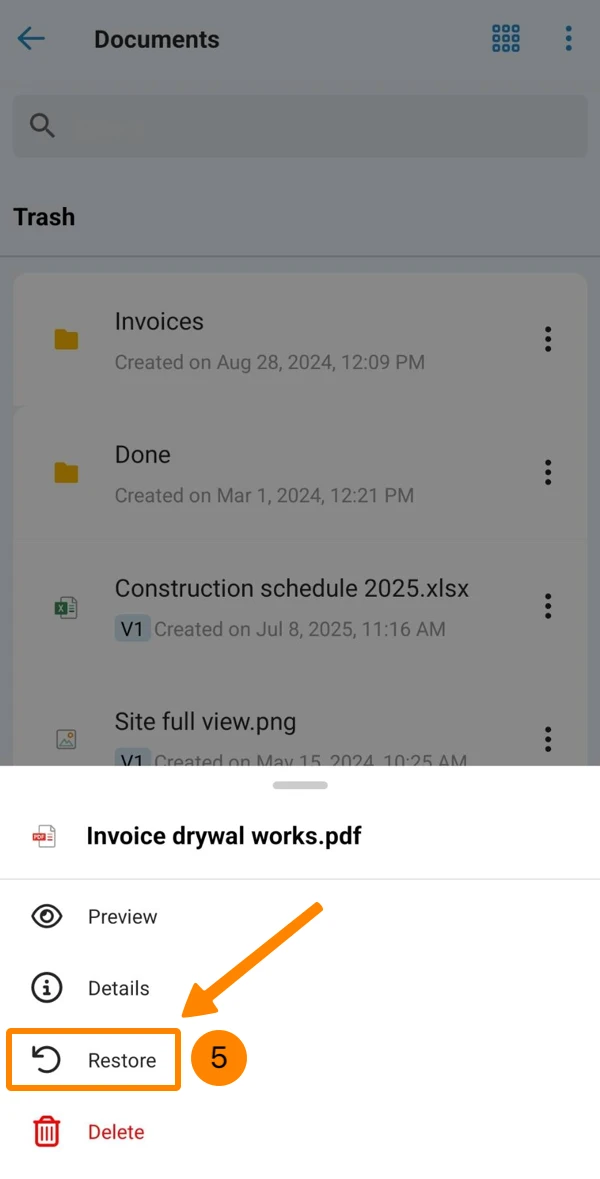
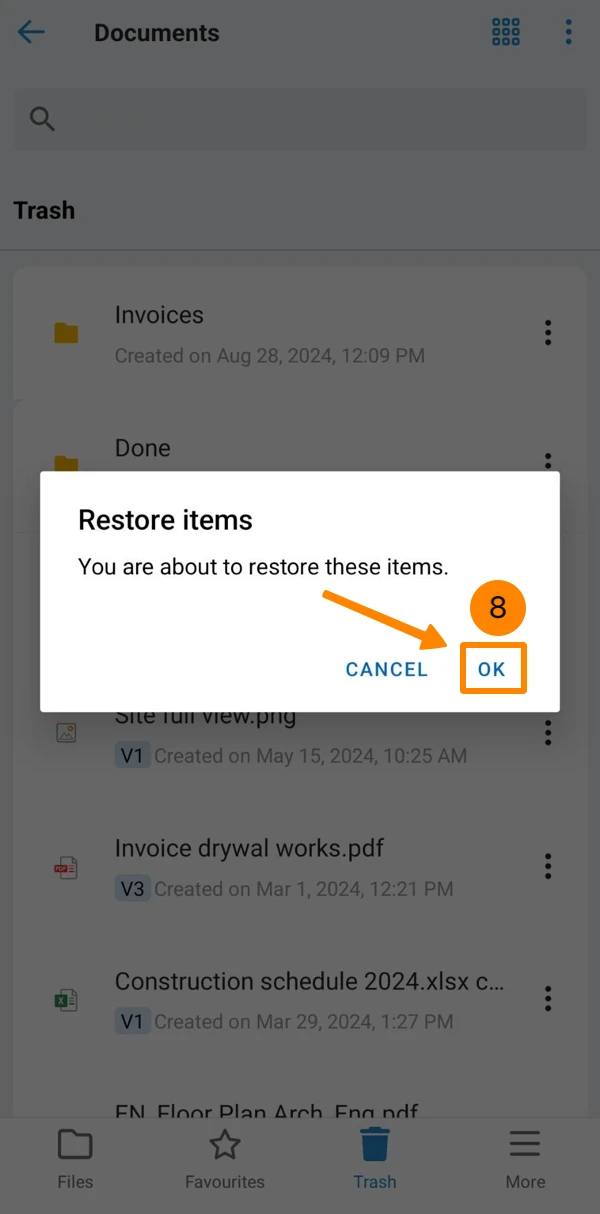
- Tap Restore
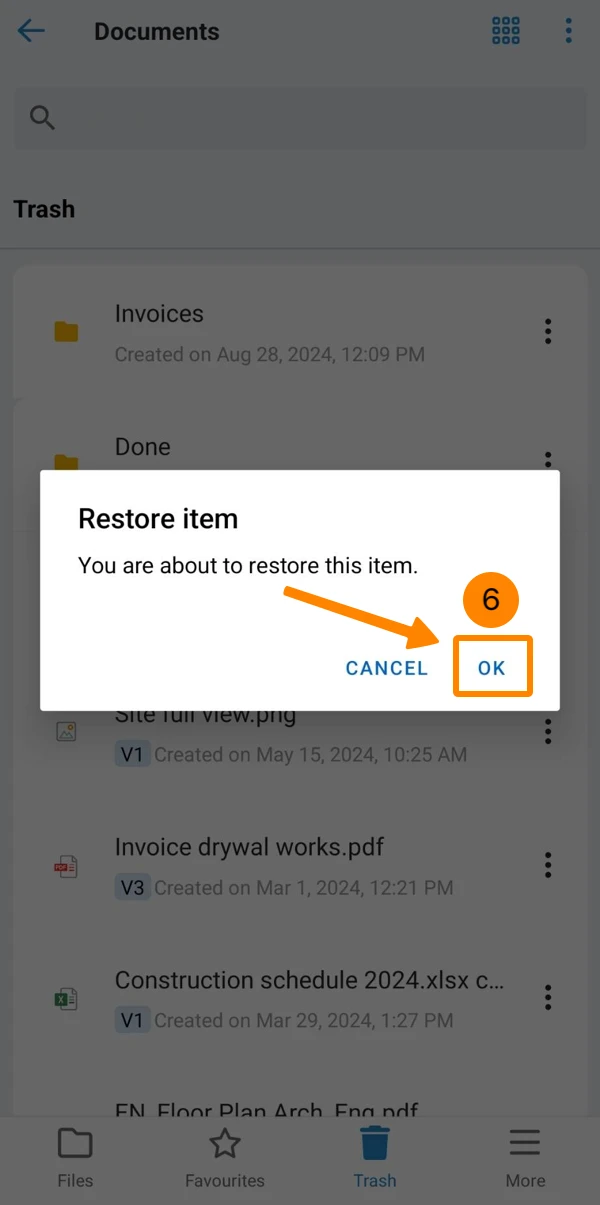
- Tap OK to confirm
Restore Multiple Files/Folders
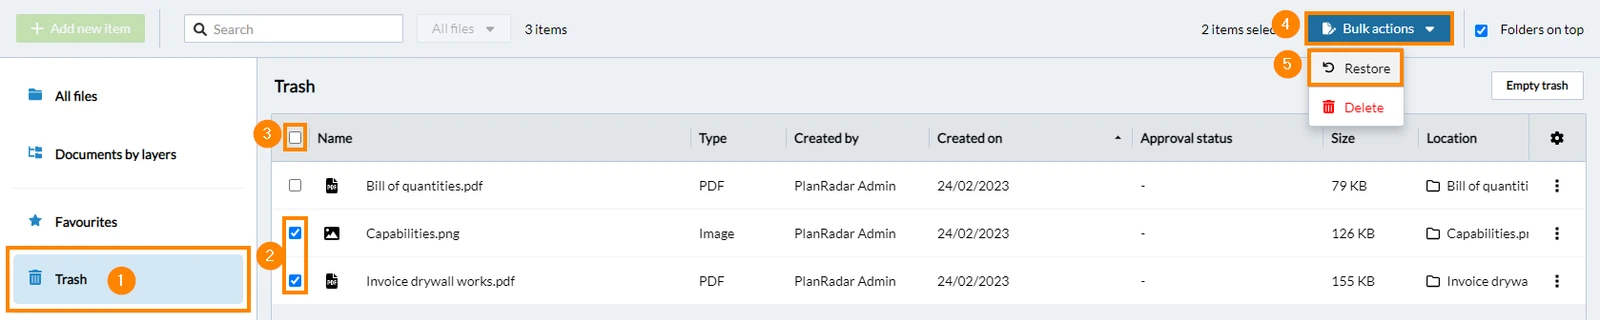
- Click Trash
- Select the checkboxes for each file or folder
- Optional: Select the select all checkbox
- Click Bulk actions
- Click Restore
- Confirm
- Open the More menu
- Tap Trash
- Open the More menu
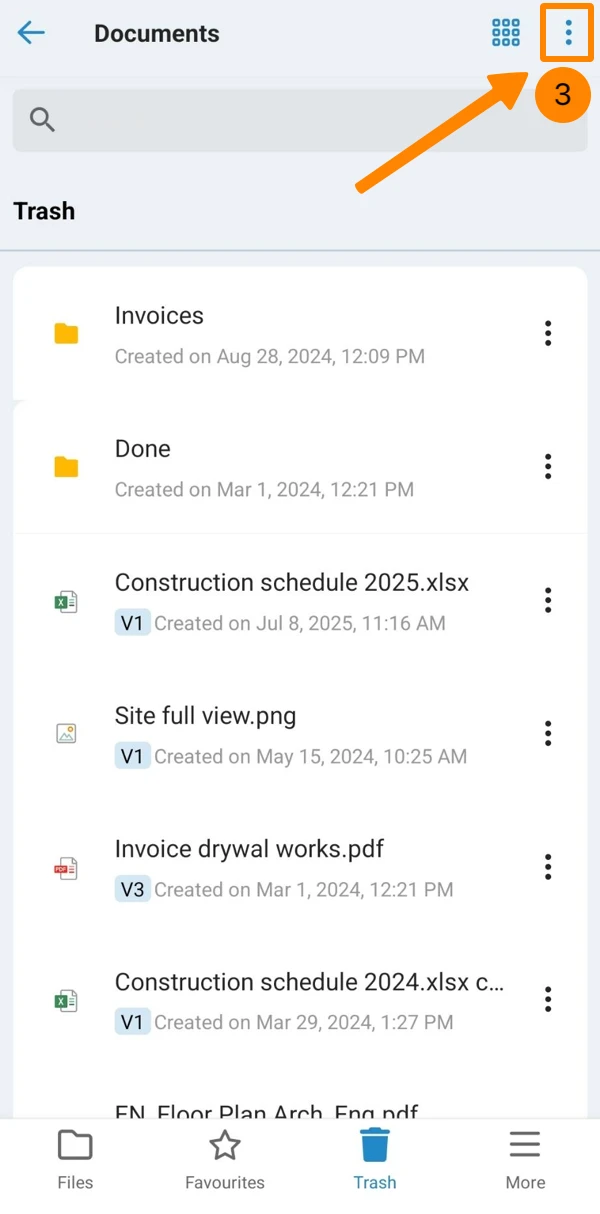
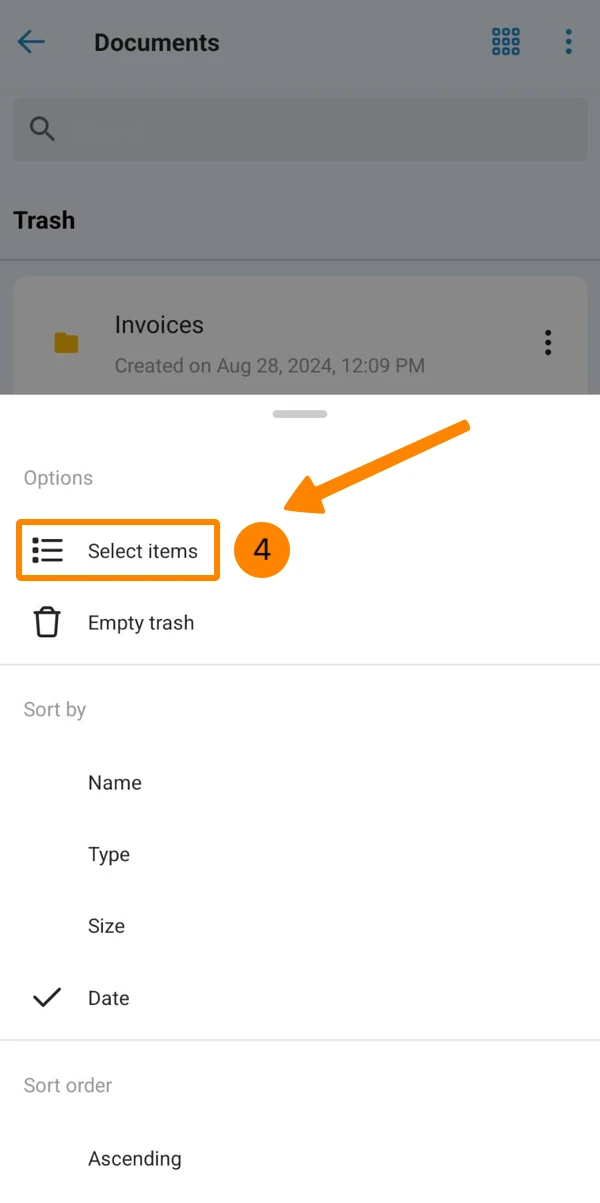
- Tap Select items
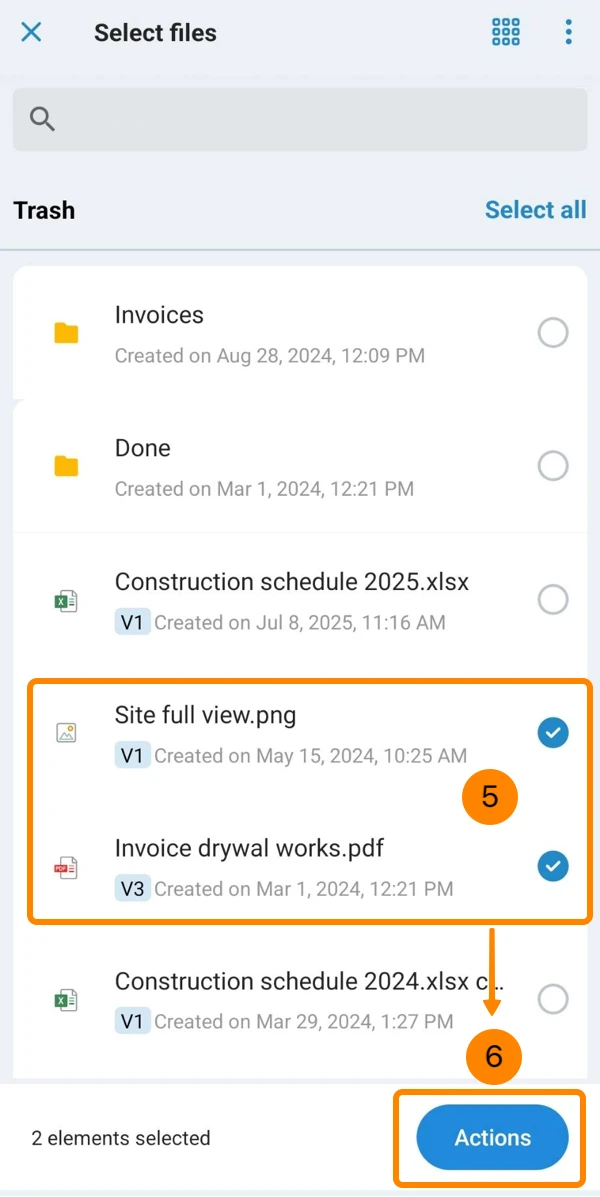
- Select the items you want to restore
- Tap Actions
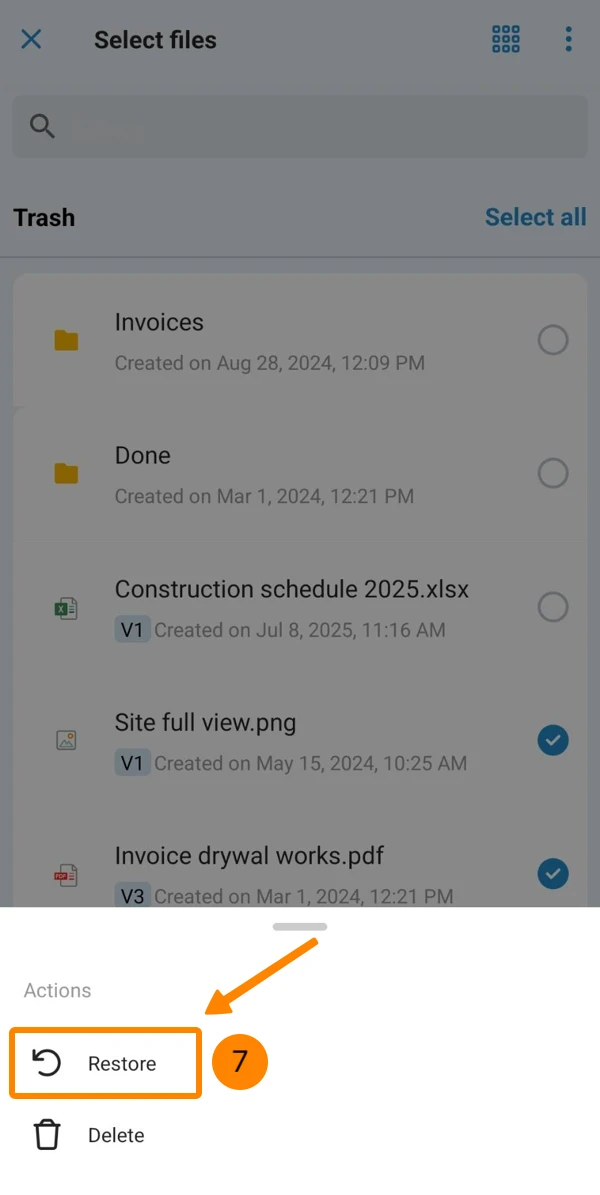
- Tap Restore
- Tap OK to confirm
Delete Permanently
To delete files or folders permanently without a possibility to restore them anymore, there are two possibilities:
Empty trash
- Click Trash
- Click Empty trash
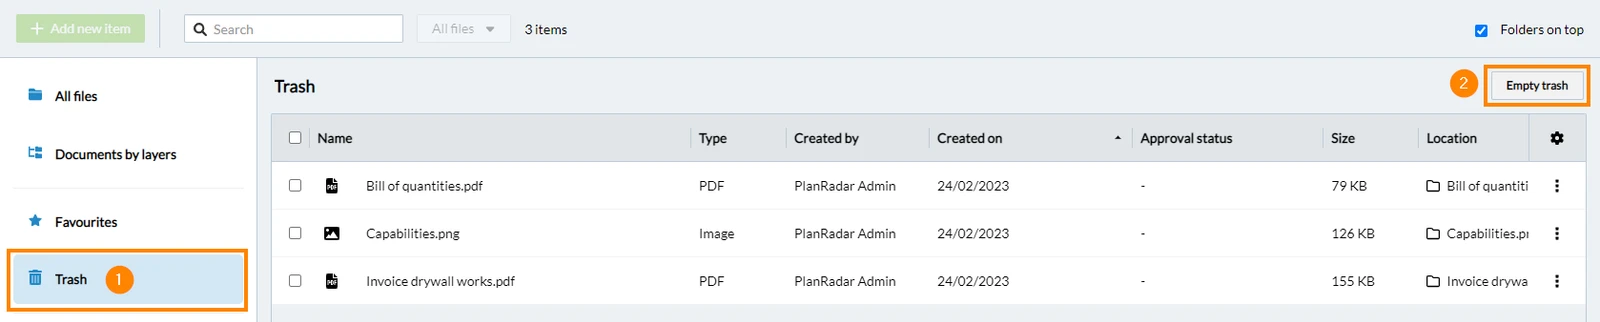
- Type Delete
- Click Delete permanently

- Open the More menu
- Tap Trash
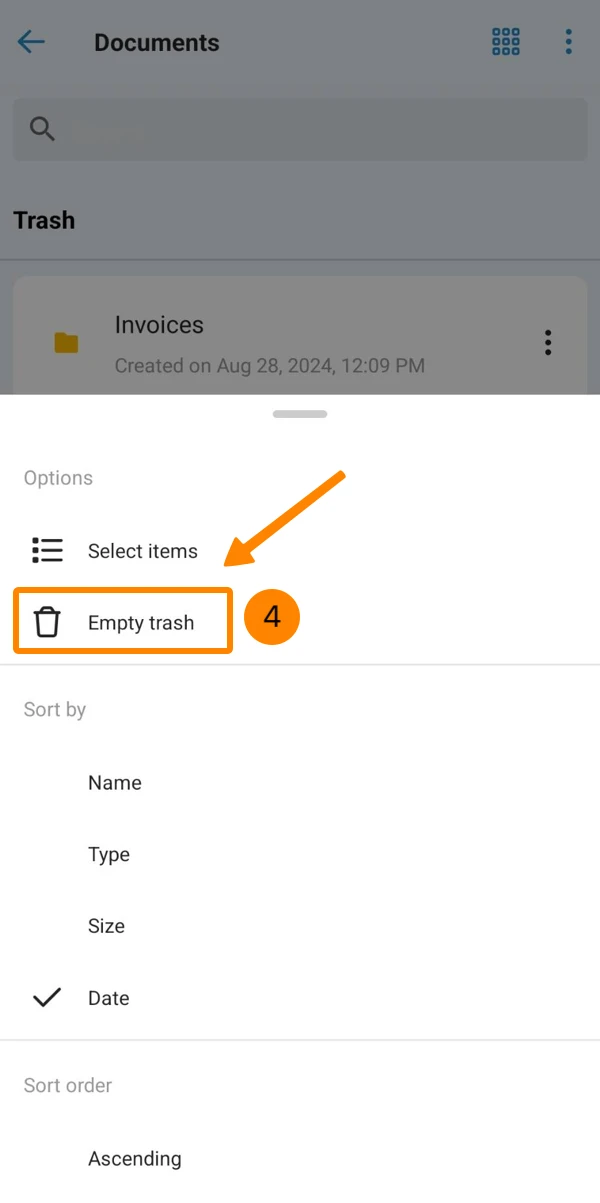
- Open the More menu
- Tap Emtpy trash
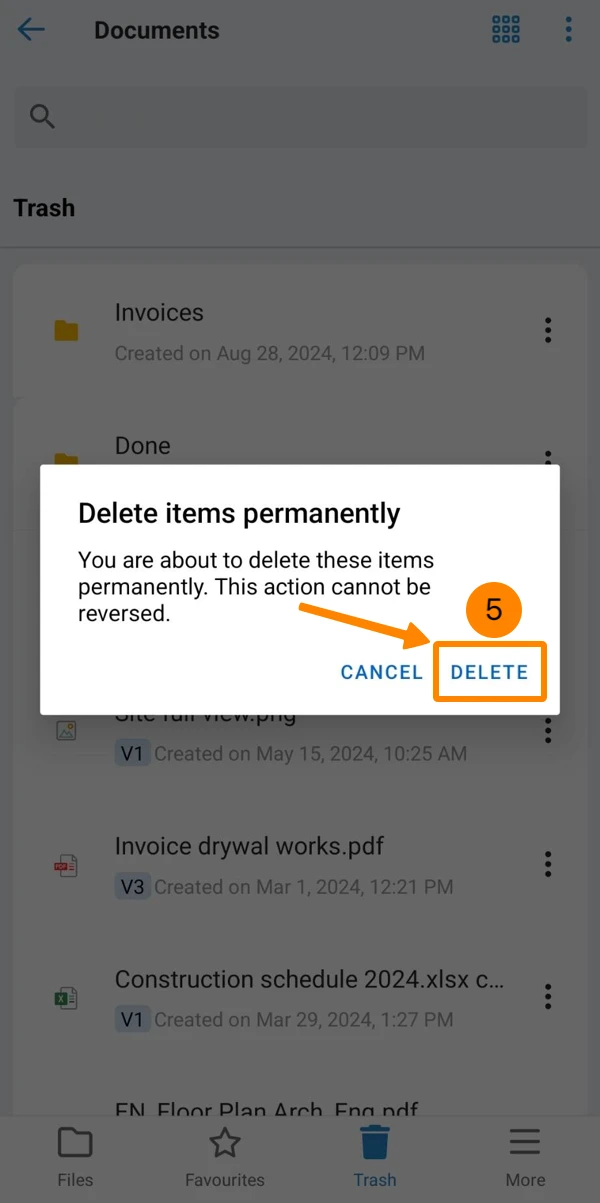
- Tap DELETE to confirm
Delete individual files/folders from trash
- Click Trash
- Click More
- Click Delete permanently
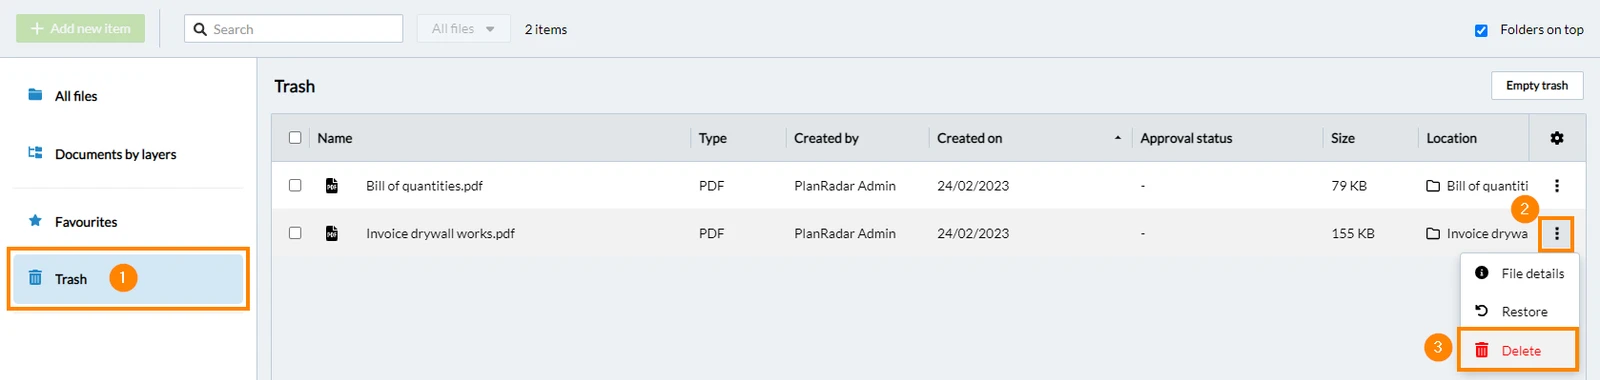
- Type Delete
- Click Delete permanently

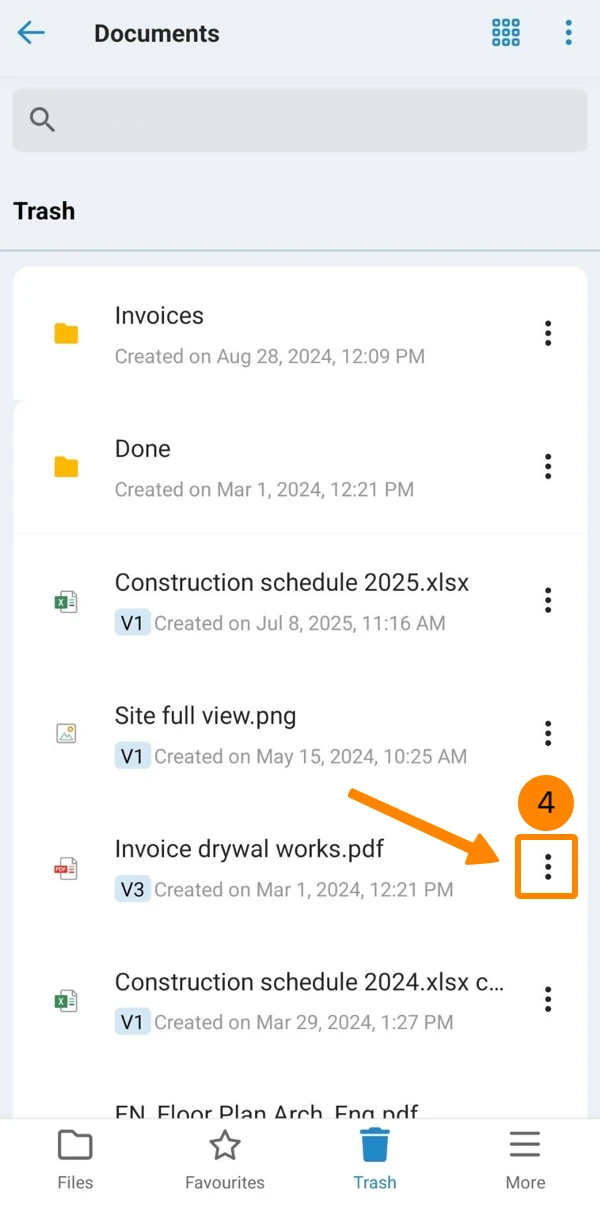
- Open the More menu
- Tap Trash
- Navigate to the item that you want to delete permanently
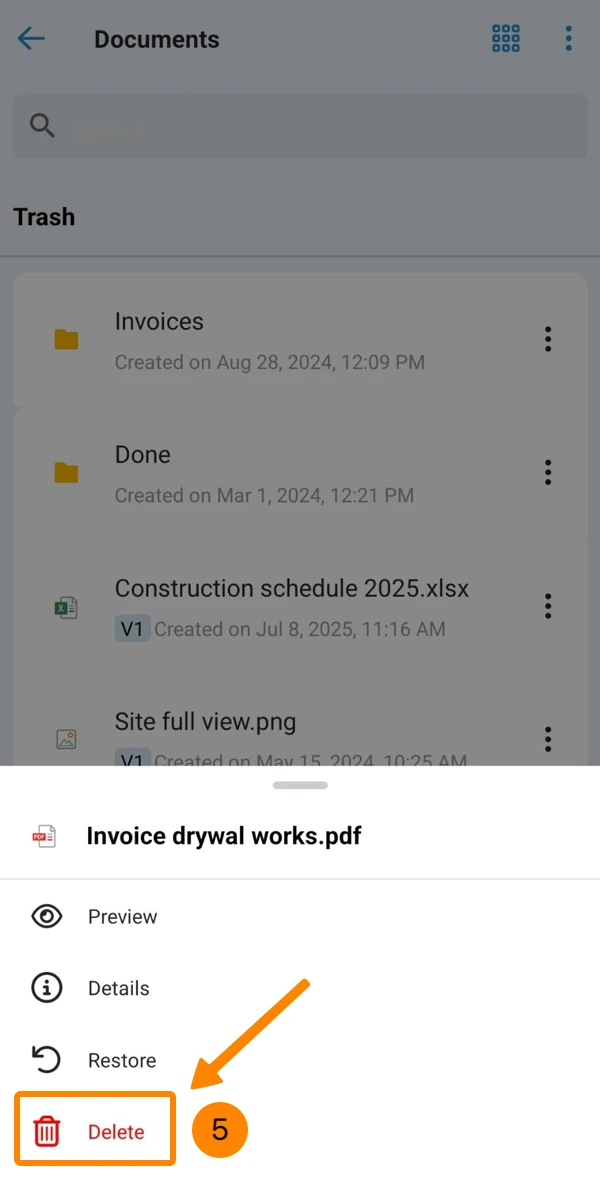
- Open the More menu
- Tap Delete
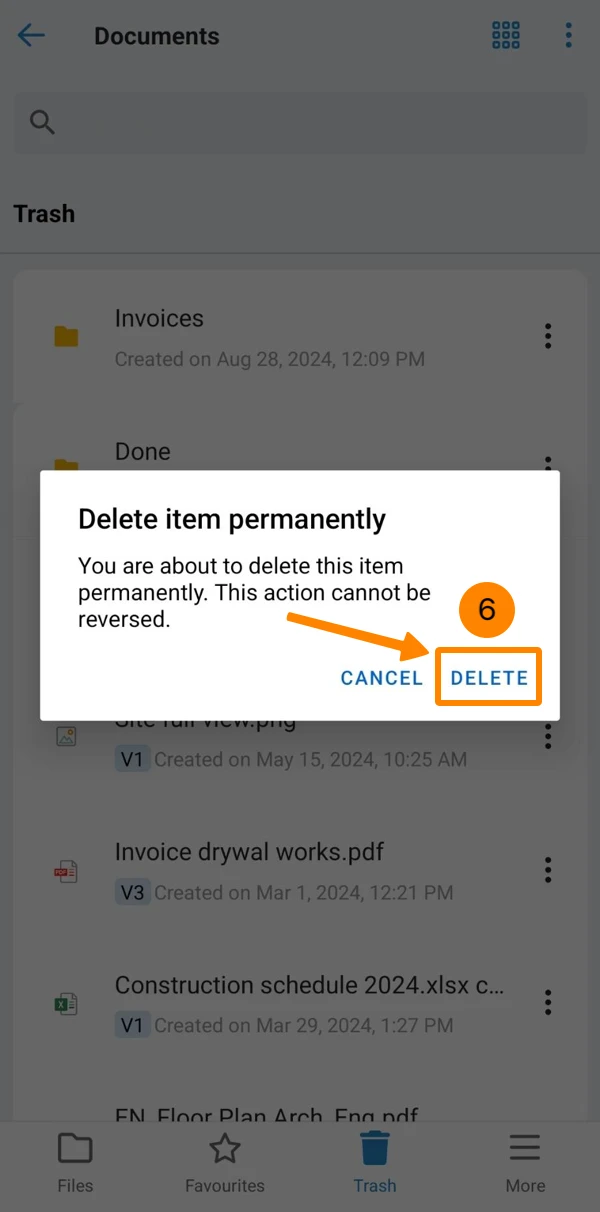
- Tap DELETE to confirm
Upload a New File Version
Unless approvals are used, uploading a new version of a file will replace the old version of the file as a new current version.
There are three ways to upload a new file version:
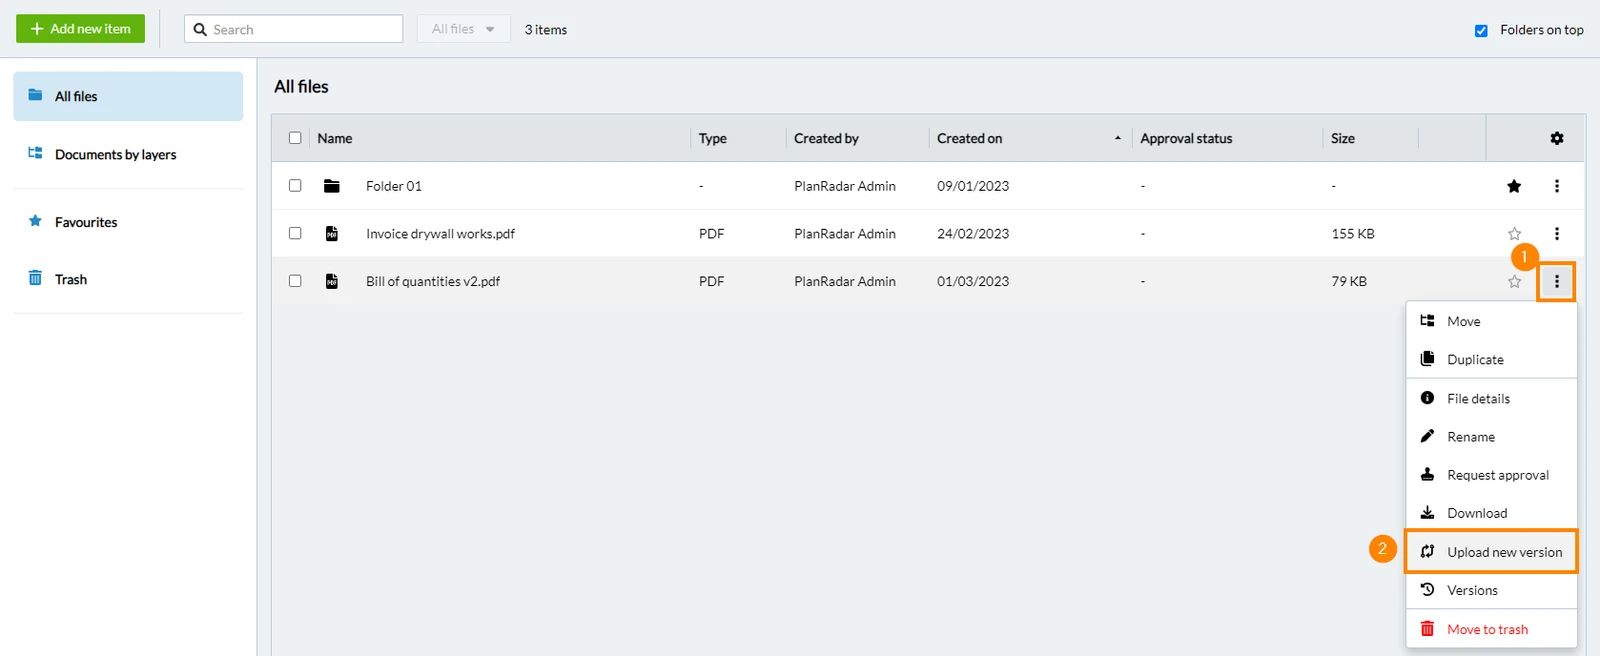
In the more menu of the files list
- Click More
- Click Upload new version
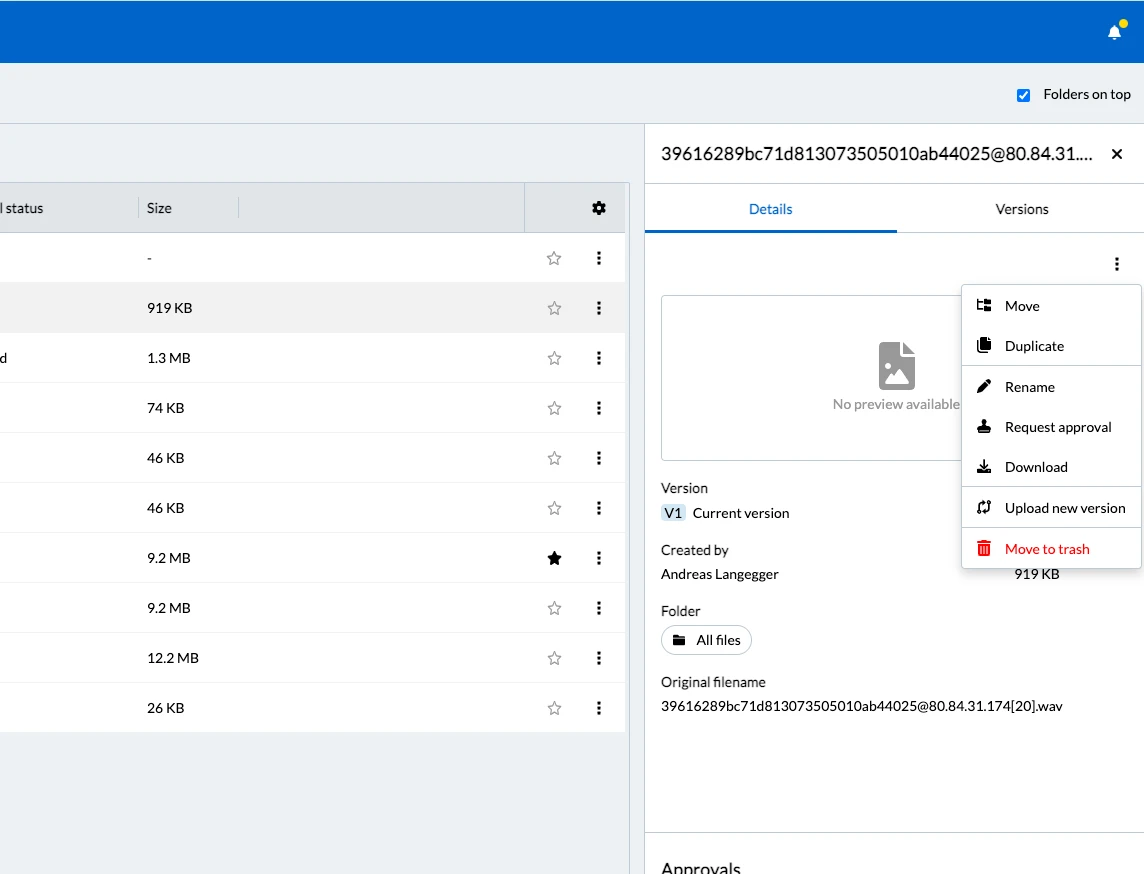
In the file details tab
- Click More
- Click File details
- Click More in the Details tab
- Click Upload new version
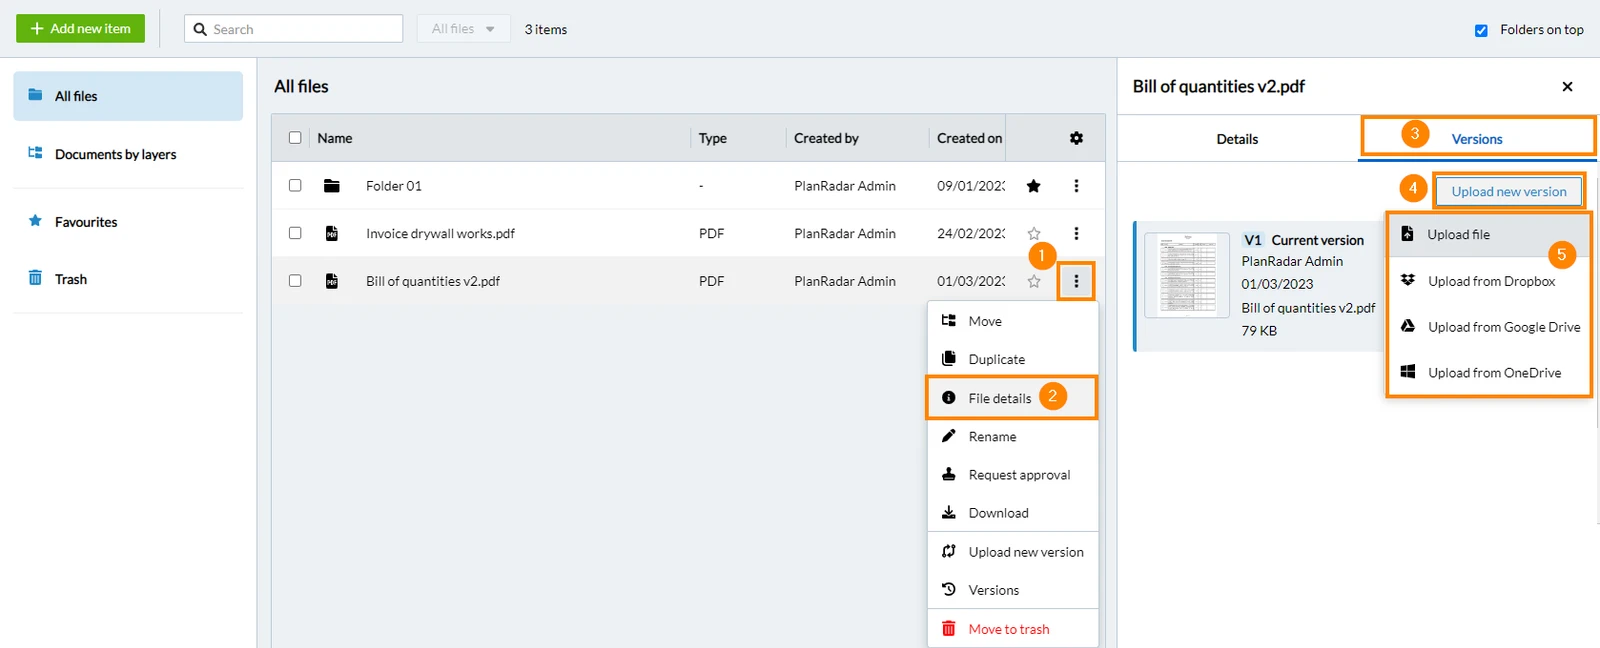
In the versions tab
- Click More
- Click File details
- Click Versions
- Click Upload new version
- Click Upload file (or upload from Dropbox, ...)
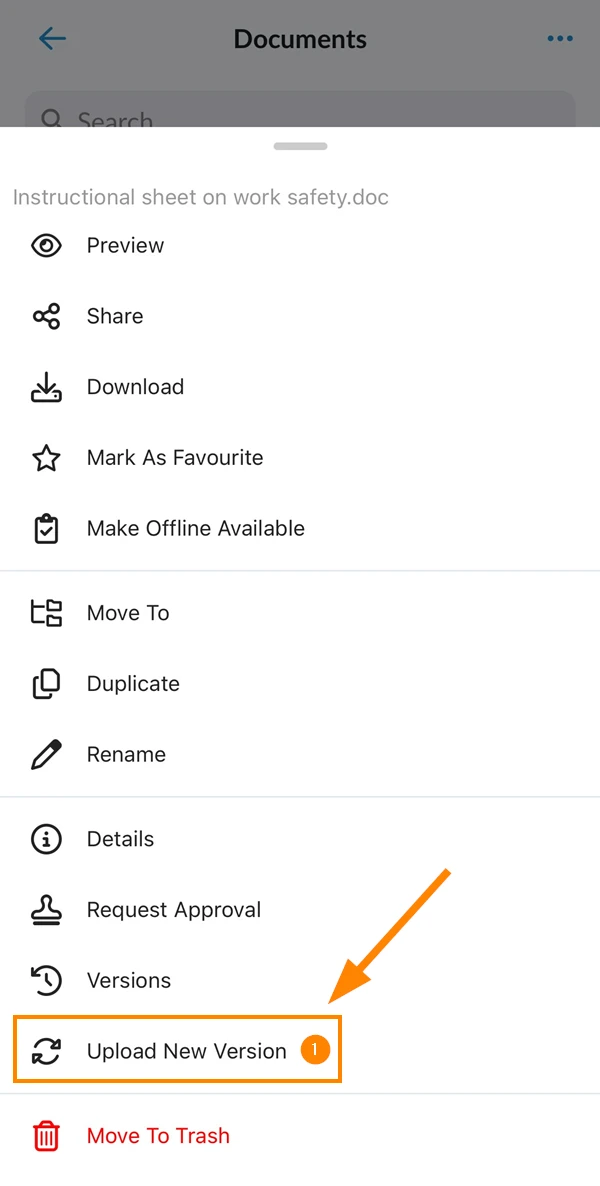
- Navigate to the file that you want to update.
- Tap More
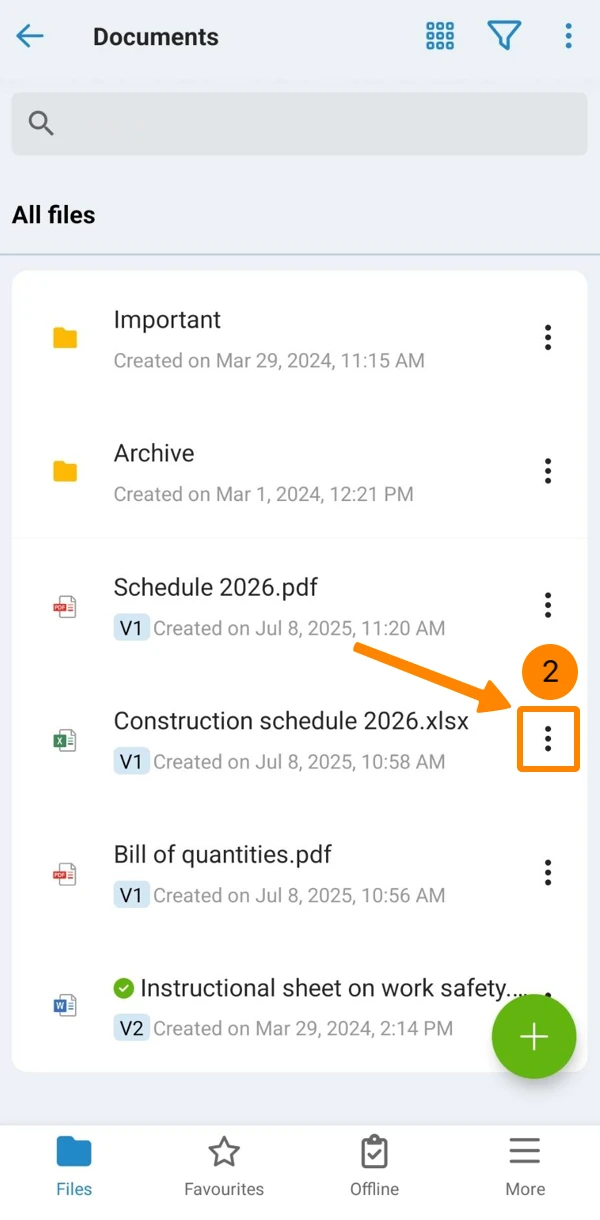
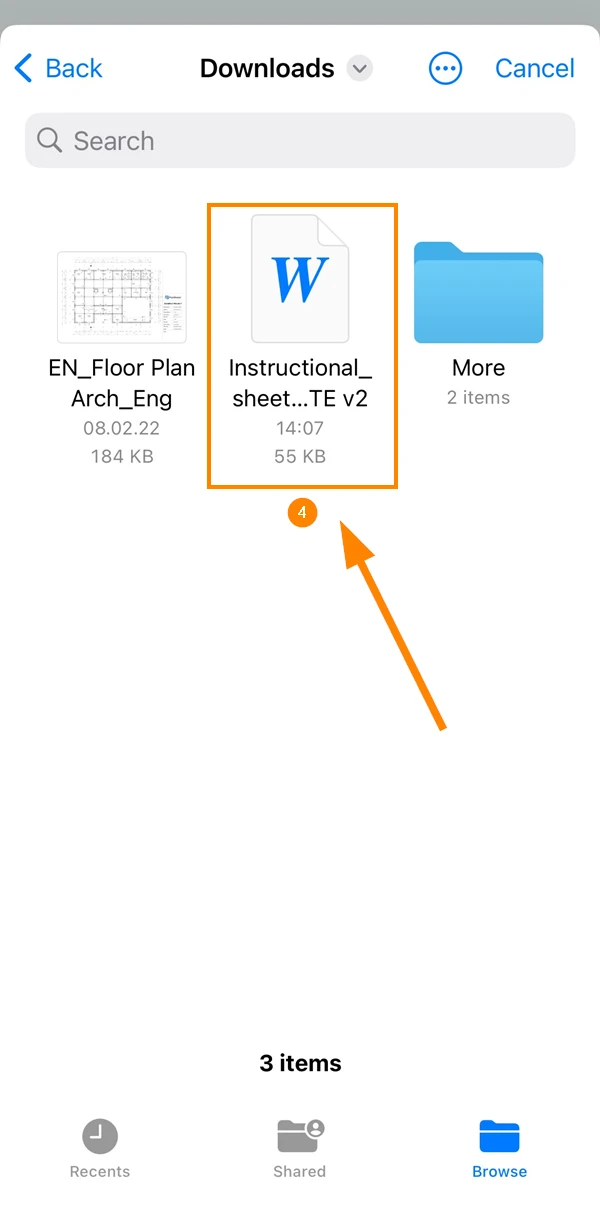
- Tap Upload New Version
- Select the new file
Updated April 27, 2026